Appointment Change Action (PA) - Transfer Different Agency
Use this procedure to process an appointment change action for an employee who is moving to a different agency with no break in service. This action is completed by the gaining agency.
Before completing this action, the employee must be active in HRMS and there must be a position in the gaining agency to appoint the employee into.
This procedure may require hand-off to other roles (payroll processor and/or benefits processor) depending on the structure of your agency and your role at your agency. The payroll processor should refer to the Appointment Change Action (PY) - Transfer Different Agency procedure and the benefits processor should refer to the Appointment Change Action (BN) – Transfer Different Agency procedure for their portions of the action.
When an employee is moving to a different agency:
- The gaining agency must contact the losing agency to inform them of the appointment.
- The losing agency will need to have entered, changed, or deleted any necessary data prior to the gaining agency performing the appointment change action; such as enter or delete leave in CATS, complete garnishments, enter or end agency-specific deductions or payments. The losing agency must also check the employee's PSLF status and certify employment upon their departure if the employee has not opted out of PSLF. If you have any questions about the PSLF process as an employer, please send your question(s) to PSLF@ofm.wa.gov.
Be sure to communicate with your payroll processor before entering a retroactive action.
-
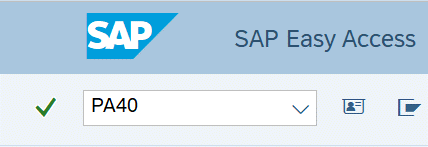
Step 1
Enter transaction code PA40 in the command field and click the Enter button.
-
Step 2
Complete the following fields:
- Personnel no.
- From
 TIPS:
TIPS:The From date should be the effective date of the employee’s appointment change.
-
Step 3
Click the Enter button to populate the employee information.
-
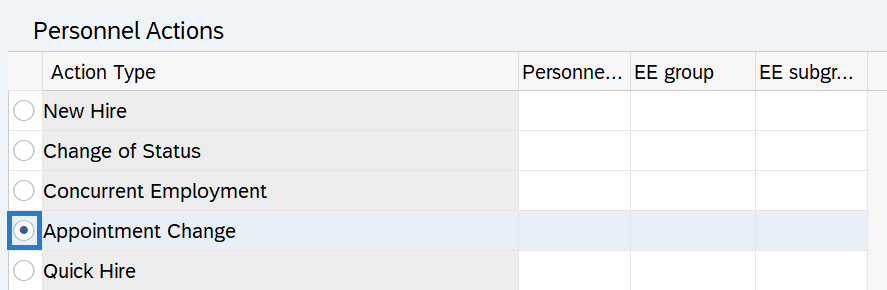
Step 4
Select the Appointment Change radio button.
-
Step 5
Click the Execute button to begin the transaction.
-
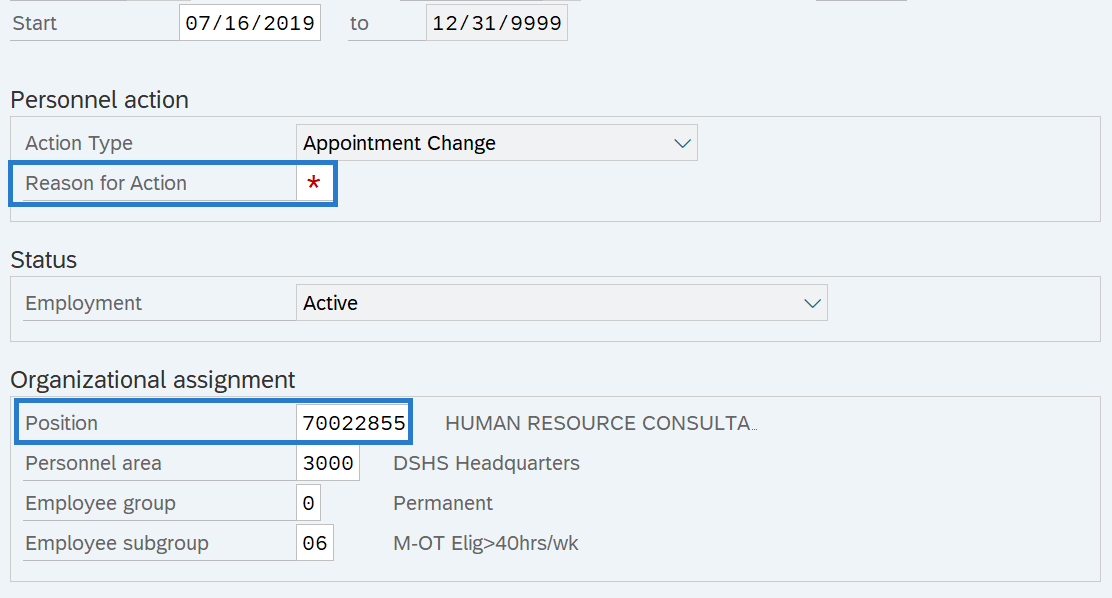
Step 6
Complete the Actions (0000) infotype.
The following fields are mandatory:
The following fields will default:
- To
- Action Type
- Employment
-
Step 7
Click the Enter button to validate the information.
-
Step 8
An information window will appear. Click the continue button.
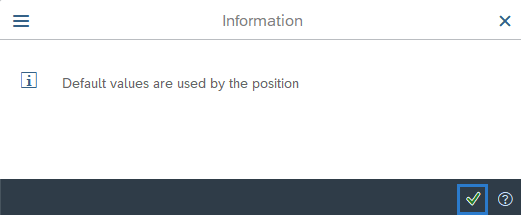
The following fields defaulted from the position. Confirm the defaulted fields are correct, or make necessary changes:
- Personnel area
- Employee group
- Employee subgroup
-
Step 9
Click the Enter button to validate the information.
-
Step 10
Click the Save button.
-
Step 11
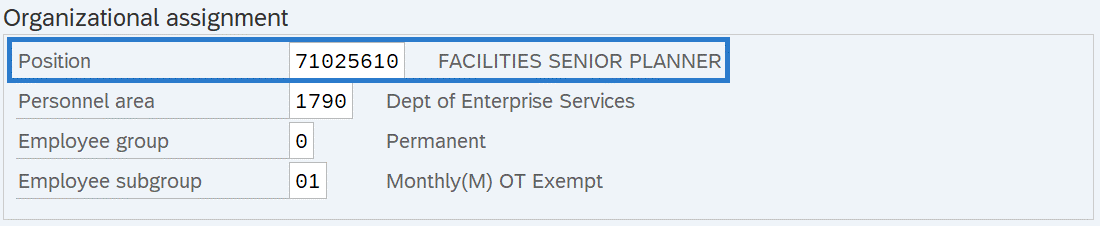
Complete the Organizational Assignment (0001) infotype.
Most fields will default based on the position’s values.
The following fields are mandatory:

The following fields are optional:
- Time Administrator
- Org. Key
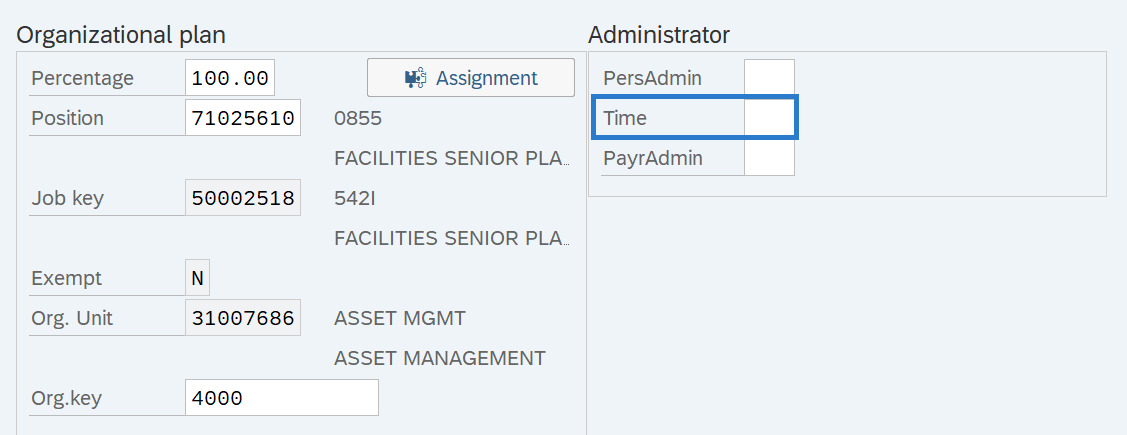 TIPS:
TIPS:The Contract, Time Administrator, and Org. key fields will carry over from the previous infotype record. Review all fields and make applicable changes.
If the employee will be doing a different job than that assigned to their position (such as in-training or under fill appointments), notify your organizational management processor so they can create a Job to Person Relationship. Refer to the In-Training Appointments Coding Reference Guide for additional coding guidance.
-
Step 12
Click the Enter button to validate the information.
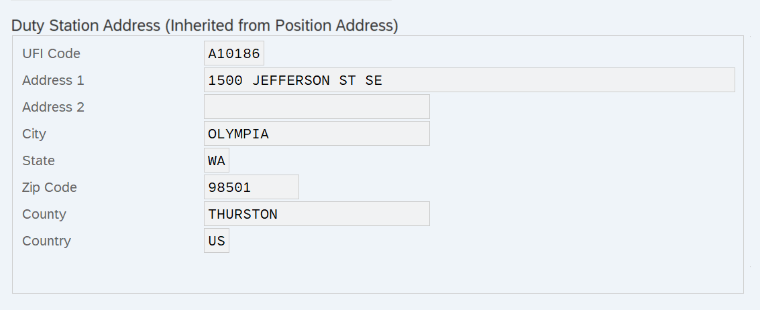
The following fields will populate based on the position's Address (1028) infotype:
- UFI
- Address 1
- Address 2
- City
- State
- Zip Code
- County
- Country
-
Step 13
Click the Save button.
-
Step 14
A Create Vacancy window may appear. Click the Cancel button.
 TIPS:
TIPS:The gaining agency cannot create the vacancy for the losing agency. Please contact the losing agency to inform them of the vacancy.
-
Step 15
A Delimit Vacancy window my appear. Select the appropriate option for the position the employee is going into.
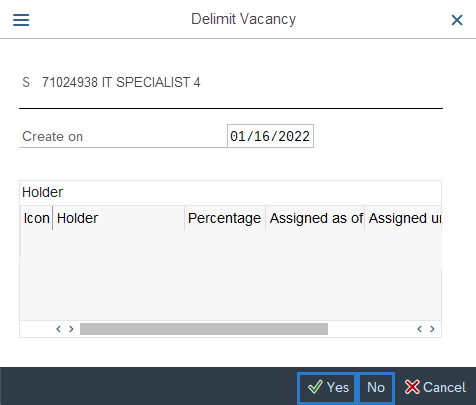 TIPS:
TIPS:The Delimit Vacancy box will only appear if the position’s vacancy indicator is marked “Open”. Refer to the Vacancy Indicator Guide for tips on completing the “Delimit Vacancy” box.
-
Step 16
You will immediately be directed back to the PA40 screen. Click the Execute button from the PA40 screen to continue the transaction.
-
Step 17
Click the Execute info group button.
TIPS:The status bar will display “Record stored only in Additional Actions infotype. Save”
-
Step 18
Click the Save button.
-
Step 19
Click the Enter button on the Information box.
-
Step 20
Validate the Organizational Assignment (0001) infotype.
-
Step 21
Click the Save button.
TIPS:The status bar will state “This entry deletes a record," this is correct. It is important to save this infotype again, even though you receive this message.
-
Step 22
Click the Enter button.
-
Step 23
A Cost Distribution (0027) information window may appear. Click the Enter button to continue.
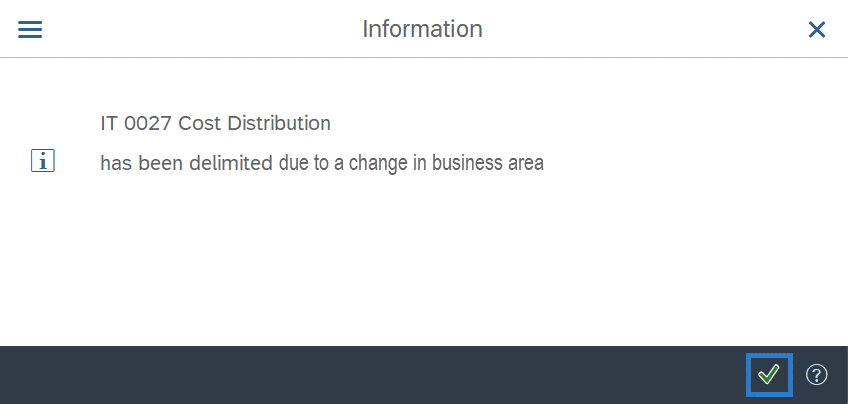 TIPS:
TIPS:This information window will appear if the employee has an active Cost Distribution (0027) infotype record. The system will delimit the record so that the losing agency’s cost distribution is no longer active.
-
Step 24
Complete the Contract Elements (0016) infotype.
The following field is mandatory:
The following field is optional:
- Probationary Period
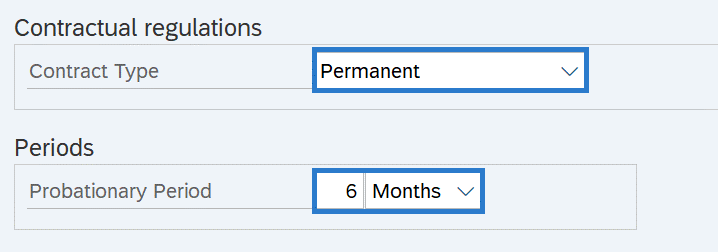 TIPS:
TIPS:If the Probationary Period field is left blank, the Create Monitoring of Tasks (0019) infotype is skipped. Go to step 30.
-
Step 25
Click the Enter button to validate the information.
-
Step 26
Click the Save button.
-
Step 27
Complete the Monitoring of Tasks (0019) infotype.
The following fields will default:
- Task Type
- Date of Task
- Processing indicator
The following fields are optional:
- Reminder Date
- Lead/follow-up time
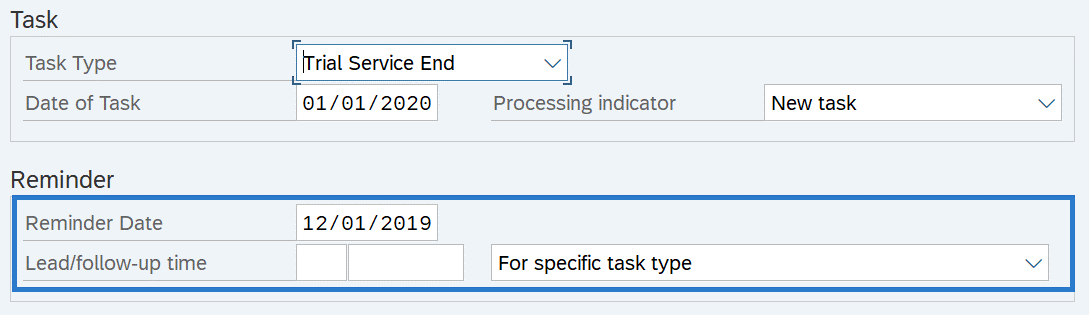 TIPS:
TIPS:The Reminder Date field can be completed by one of the following:
- Enter a Reminder Date, or
- Enter the Lead/follow-up time. The Reminder Date field will populate based on what was entered in the Lead/follow-up time field, or
- Leave the Reminder Date and Lead/follow-up time blank. The Reminder Date field will populate with a date two months prior to the Date of Task.
Run the Task Monitoring Report (S_PH0_48000450) to view the reminder dates and task dates for the tasks entered on this infotype.
Only one task can be entered during the appointment change action (PA40). If you have more than one task to create for the employee, follow the Monitoring of Tasks - Create New Record procedure.
-
Step 28
Click the Enter button to validate the information.
-
Step 29
Click the Save button.
-
Step 30
Complete the Communication (0105) infotype.
The following field is mandatory:
- System ID
 TIPS:
TIPS:The System ID field should be the employee’s email address.
If you are a MyPortal agency, it is highly recommended to use an employee’s work email address. This email address is used for password resets and the leave request notification process.
Agencies that have employees who do not have a work email address will need to determine an internal business process to notify these employees of the status of a leave request.
If you do not know the employee’s work email address at the time of the appointment change, click the Next Record button and skip to step 33. Enter the email address as soon as you obtain it by following the Communication - Copy and Update Record procedure.
-
Step 31
Click the Enter button to validate the information.
-
Step 32
Click the Save button.
-
Step 33
Complete the Planned Working Time (0007) infotype.
The following fields are mandatory:
The following fields will default:
- Work schedule rule
- Time Mgmt status
- Part-time employee
- Additional time ID
- Employment Percent
- Time Type Override
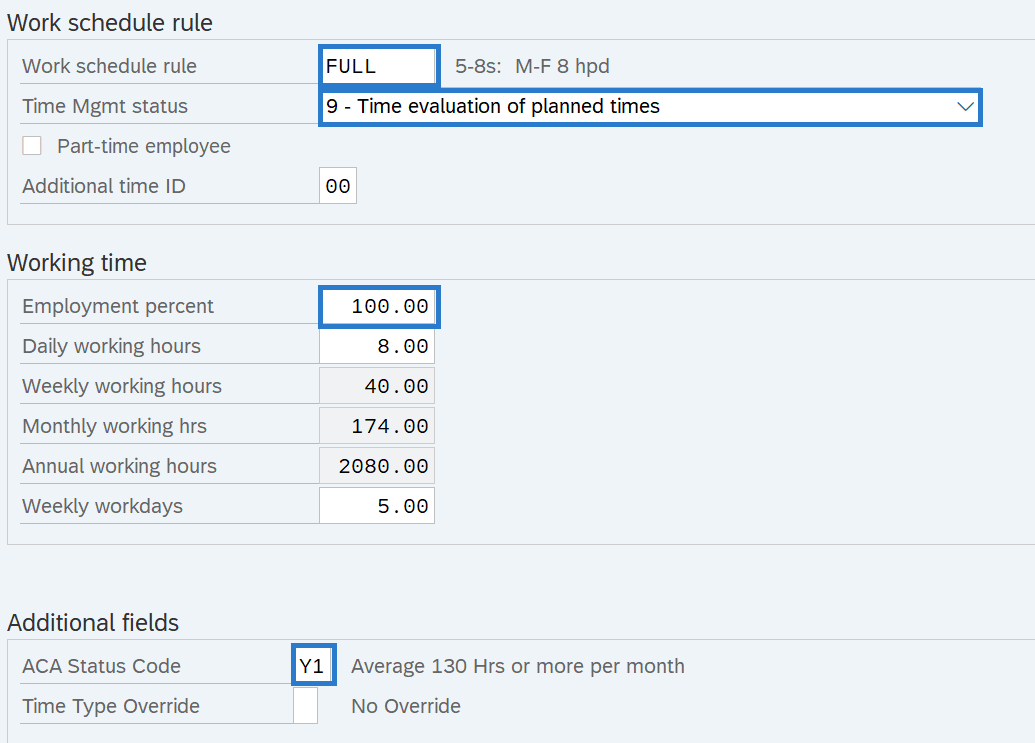 TIPS:
TIPS:The Work schedule rule will default based on the Employee Subgroup entered in the action. You will need to select the appropriate work schedule for the employee.
It is important to check the Part-time employee box for all part-time employees. This field will default, but please validate the default value is correct. Refer to the Part-time Employees Coding Reference Guide for more information on coding part-time employees.
The Additional time ID field defaults to blank, but should be changed if the employee is not eligible for normal vacation and sick leave accruals.
If the employee is changing from or to the 24/7 (R030) work schedule rule, additional action is needed so that HRMS can accurately calculate the proration of time for each schedule. When there is a mid-period change with a 24/7 (R030) work schedule rule, you should either start the work schedule on the first day of the period or create a schedule substitution that reflects the employee's work hours. Refer to the Work Schedule Substitution procedure for more information.
The ACA Status Code is required for all new hires, rehires, and employees who have had a change in employment status. Do not leave the default code of “Not Assigned”. Please contact HCA through FUZE if you need assistance determining the correct ACA code.
The Time Type Override field is optional and only required if the agency needs to override the general timesheet requirements of an employee.
-
Step 34
Click the Enter button to validate the information.
-
Step 35
Click the Save button.
-
Step 36
Complete the Telework/Flex Work (Employee) (9106) infotype.
The following fields are conditional:
 TIPS:
TIPS:Employees should have an active Telework/Flex Work (Employee) record. Refer to the HRMS Data Definitions Resource Guide for more information on how this data is used.
Enter the employee's participation in the Telework (EE), Flextime (EE), and Compressed Workweek (EE) fields. Do not leave these fields blank. If the employee is not participating, then use the Not Participating (NP) selection value instead of blank.
Completing the Flex work hours is optional. HRMS automatically converts entries to the Flex work hours fields to “German Standard” Military Time. If you have someone whose start or end time is midnight, use “24:00:00” rather than 12:00 am. If 12:00 am is entered, it will default to 00:00:00 and you must overwrite the default value with “24:00:00”.
-
Step 37
Click the Enter button to validate the information.
-
Step 38
Click the Save button.
-
Step 39
Complete the Date Specifications (0041) infotype.
Date types and corresponding dates will carry over from the previous infotype record. Review all fields and make applicable changes.
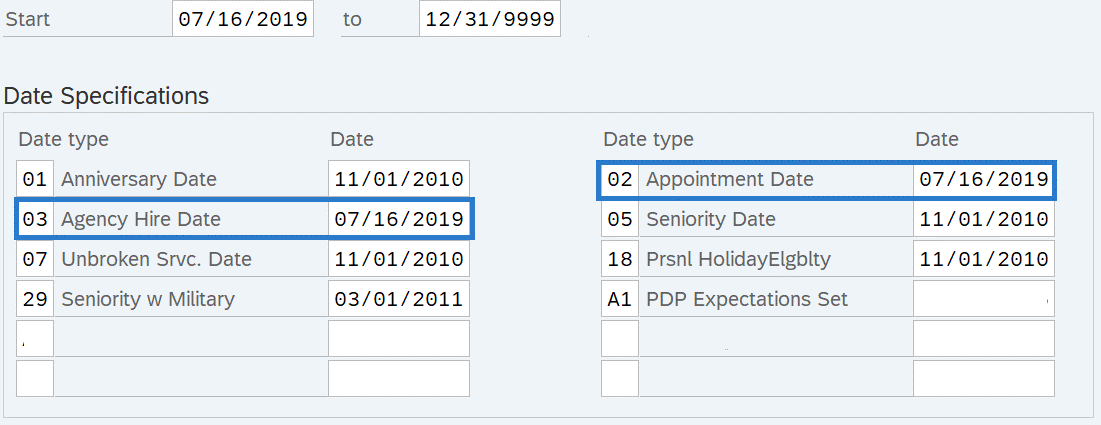 TIPS:
TIPS:This infotype is limited to 12 date types for each record.
Remove any date types and dates that are no longer applicable, such as Prsnl Lv Day Elgblty (26) if the employee is no longer eligible for a personal leave day.
-
Step 40
Click the Enter button to validate the information.
-
Step 41
Click the Save button.
-
Step 42
Complete the Basic Pay (0008) infotype.
For employees who are indirectly valued, the following fields are mandatory:
For employees who are directly valued, the following fields are mandatory:
- Reason
- Wage type Amount or Ann.salary
For all employees, the following fields will default. Ensure the default values are accurate and make changes if necessary:
- PS type
- PS Area
- PS group
- Level
- Cap.util.lvl
- WkHrs/period
- Wage Type
- Ind.val.
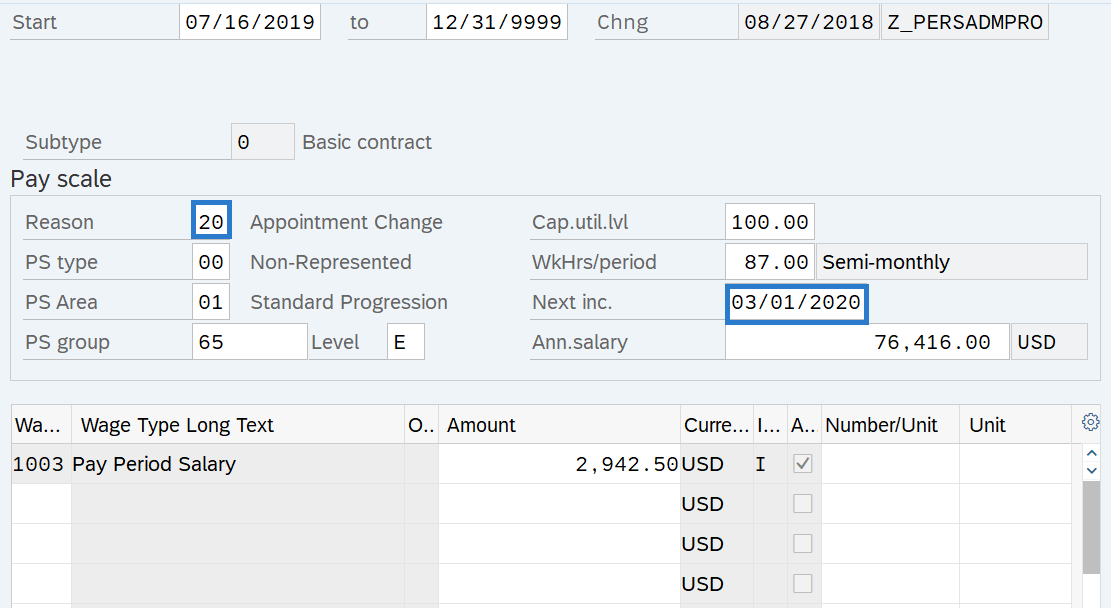 TIPS:
TIPS:The employee's Cap.util.lvl and WkHrs/period fields will default based on the employee's Planned Working Time (0007) infotype.
The employee’s pay scale / pay grade fields will default based on the employee’s position Planned Compensation (1005) infotype. The PS group should match the Pay Scale Group or Pay Grade of the job the employee is assigned. If the employee’s job is different than the position’s job, such as an in-training appointment, then change the PS Group to match the Pay Scale Group or Pay Grade of the job they are assigned. For more information on coding in-training appointments, refer to the In-Training Appointments Coding Reference Guide.
Next inc. is the date an employee is scheduled to move to a higher salary step within the salary range of their current job class. This field is used as an override when there are exceptions to the rules built into the system, or if an agency prefers to manually enter this date. If no date is entered, the system will follow the Automated PID Process.
Manually enter the next increase date during the Appointment Change action if the employee is moving to a new salary range (PS group), to ensure the employee receives their periodic increment on the correct date.
Ind.val. indicates whether an employee’s pay is indirectly valued or directly valued.
- Indirectly valued pay is derived from a salary schedule table and will automatically update when the salary schedule tables are changed. Enter the PS group and Level fields and the system will populate the wage type Amount and Ann.salary fields based on the salary schedule.
- Directly valued pay is manually entered into the wage type Amount (recommended) or Ann.salary fields.
The wage type will default based on the employee’s Employee Subgroup. Wage type 1003 is used for monthly, wage type 1001 is used for hourly, and wage type 1006 is used for daily. Enter the correct wage type if the field is blank. You can also enter wage types for additional pay, such as shift premium and assignment pay.
-
Step 43
Click the Enter button to validate the information.
-
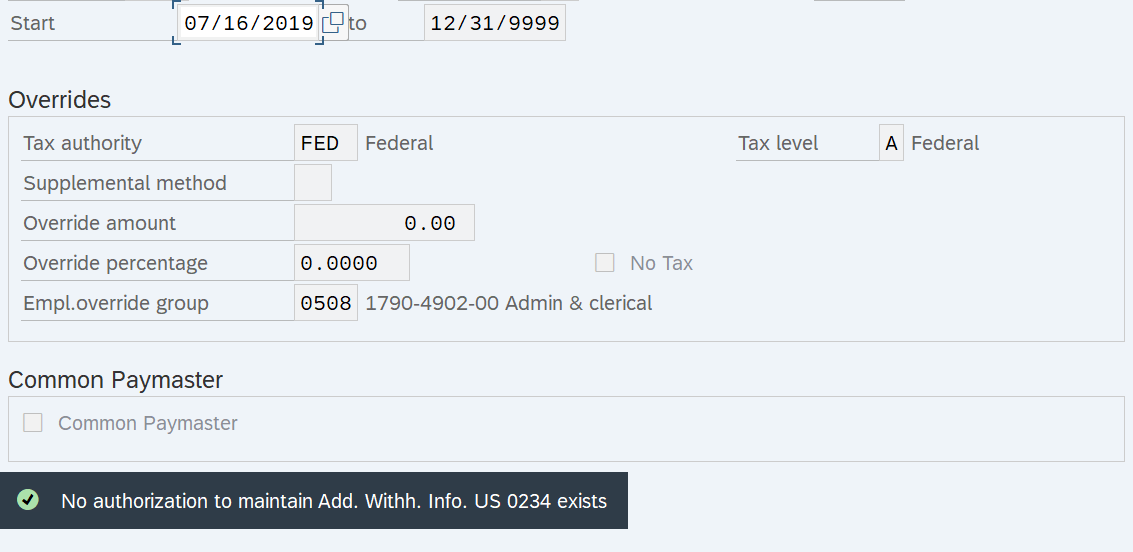
Step 44
Click the Save button.
TIPS:After the Basic Pay (0008) infotype is saved, the Add. Withh. Info. US (0234) will automatically populate. The personnel administration processor has inquiry only and does not have the ability to save this infotype.
Stop:If the employee has an active Out of State Work Location record on the Addresses (0006) infotype and the employee no longer works outside of the state of Washington, refer to the Addresses – Change Existing Record procedure to delimit the record.
Be sure to communicate with your payroll processor if the employee lives or works outside of the state of Washington.
For the personnel administration processor, this will mark the end of the Appointment Change - Transfer Different Agency action. After saving, click the Exit button and transfer the appointment change information packet to the payroll processor who will continue the action. The payroll processor should refer to the Appointment Change Action (PY) - Transfer Different Agency procedure to complete their portion of the action.