Leave of Absence Action - Create Active or Inactive Leave of Absence
Use this procedure to put an employee on a leave of absence. The procedure for processing Leave of Absence - Active or Leave of Absence - Inactive is similar (Leave of Absence - Active will be used as an example in this user procedure).
State Human Resources recommends agencies only use a Leave of Absence action type for absences in excess of 15 days, or for circumstances that require additional tracking outside the leave system.
Notify your payroll processor, benefits processor, and/or time and attendance processor of the employee's leave of absence. These roles do not make entries through the Leave of Absence (PA40) action, but they may need to delimit deductions, membership fees, or certain benefits while the employee is on leave.
If processing an Inactive Leave of Absence, the personnel administration processor should confirm with the time and attendance processor that they have deleted any future-dated time, compensation, and leave entries (including the effective date of the action and beyond) from CATS, the Employee Remuneration Info (2010) infotype, and the Absences (2001) infotype before starting the Leave of Absence Action (PA40).
Be sure to communicate with your payroll processor before entering a retroactive action.
-
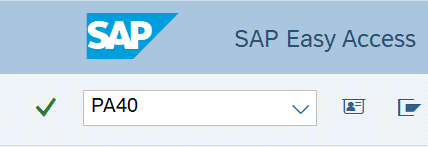
Step 1
Enter transaction code PA40 in the command field and click the Enter button.
-
Step 2
Complete the following fields:
- Personnel no.
- From
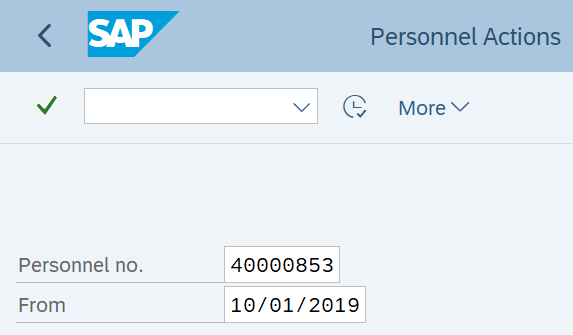 TIPS:
TIPS:The From date should be the day before the employee's approved leave of absence begins.
The Actions (0000) infotype will change the start date to the first day the employee is on a leave of absence.
-
Step 3
Click Enter to populate the employee information.
-
Step 4
Under Personnel Actions, select the Leave of Absence – Active (or Leave of Absence – Inactive) radio button.
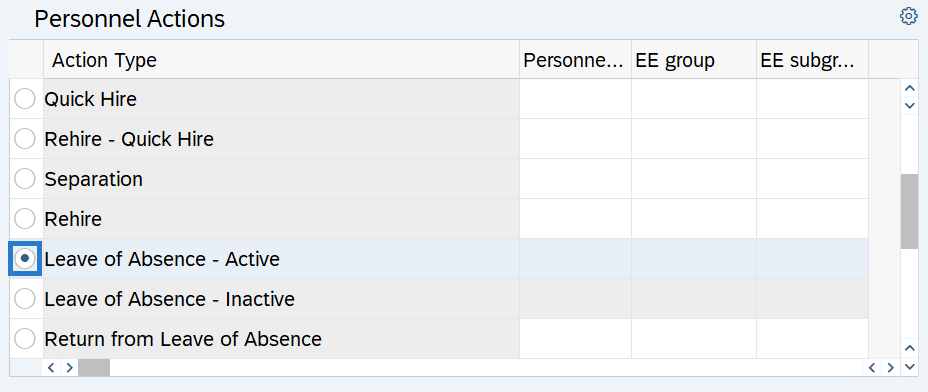 TIPS:
TIPS:Use Leave of Absence - Active when an employee on leave of absence will still receive compensation and/or use a combination of leave and leave without pay.
Use Leave of Absence - Inactive when an employee on leave of absence will not receive compensation or use leave during the absence. Do not use this action if the employee plans to submit at least 8 hours of leave per month to maintain insurance benefits.
-
Step 5
Click the Execute button to begin the transaction.
-
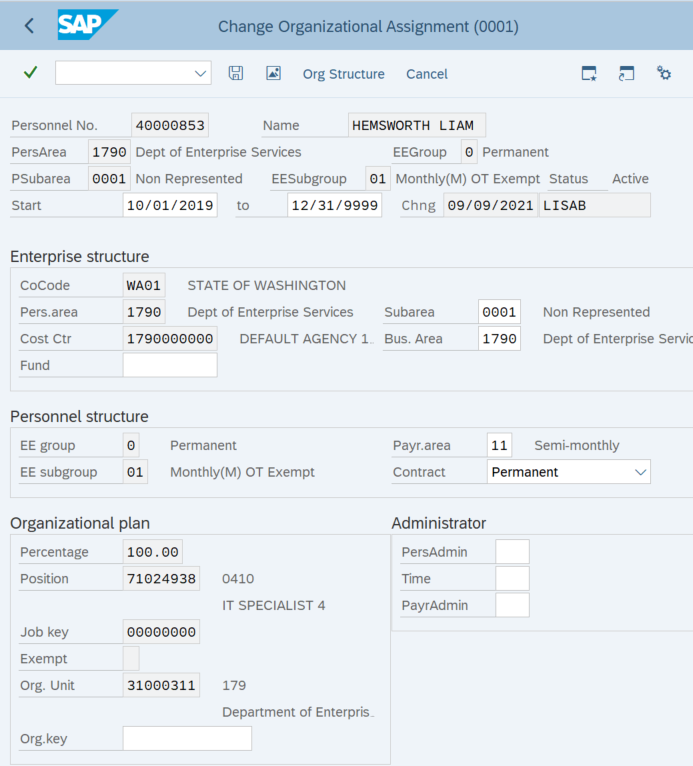
Step 6
Complete the Actions (0000) infotype.
The following field is mandatory:
The following fields will default:
- To
- Action Type
- Employment
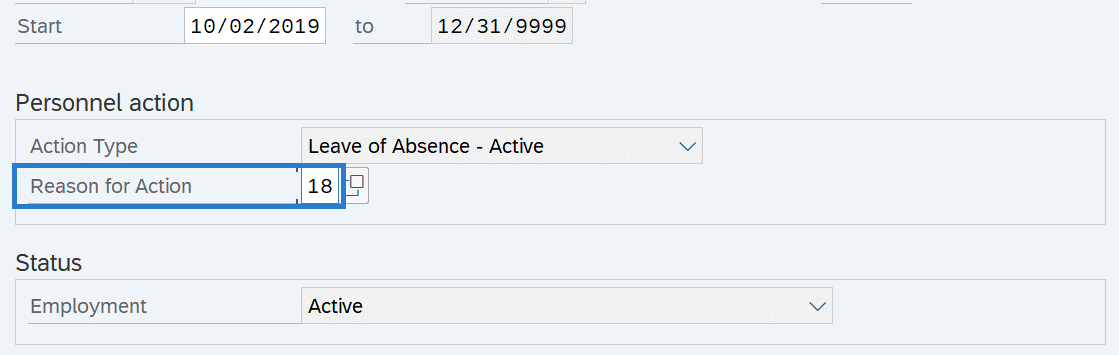 TIPS:
TIPS:For Leave of Absence – Active, the Employment status is set to Active.
For Leave of Absence – Inactive, the Employment status is set to Inactive.
-
Step 7
Click the Enter button to validate the information.
-
Step 8
Click the Save button.
-
Step 9
Review the and make any applicable changes.
-
Step 10
Click the Enter button to validate the information.
-
Step 11
Click the Save button.
-
Step 12
Complete the Monitoring of Tasks (0019) infotype.
The following fields are mandatory:
- Task Type
- Date of Task
The following fields are optional:
- Reminder Date
- Lead/follow up time
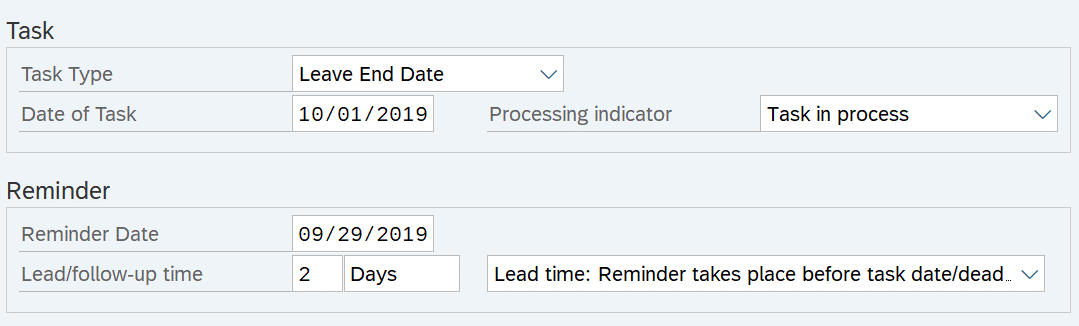 TIPS:
TIPS:If you do not want to create a new task, click the Next Record button or the Exit button.
The Reminder Date field can be completed by one of the following:
- Enter a Reminder Date, or
- Enter the Lead/follow-up time. The Reminder Date field will populate based on what was entered in the Lead/follow-up time field, or
- Leave Reminder Date and Lead/follow-up time blank. The Reminder Date field will populate with a date two months prior to the Date of Task.
Run the Task Monitoring Report (S_PH0_48000450) to view the reminder dates and task dates for the tasks entered on this infotype.
Only one task can be entered during the leave of absence action (PA40). If you have more than one task to create for the employee, follow the Monitoring of Tasks - Create New Record procedure.
-
Step 13
Click the Enter button to validate the infomation.
-
Step 14
Click the Save button.
Stop:For the personnel administration processor, this will mark the end of the Leave of Absence - Active or Inactive action. After saving, click the Exit button. Communicate with your payroll office, benefits office, and time and attendance processor to notify them of the leave of absence because they may have changes to enter for the employee as well.