Outlook Payroll Calendar Upload
Use this procedure to import a CSV file outlining important processing dates directly into your Outlook calendar.
The following CSV file options are available depending on the reminders which you choose to be notified of via your Outlook calendar:
| CSV File | Contents/Details |
|---|---|
| 2026 Payroll - Busy | Payroll dates included. Shows in Outlook as Busy all day on Payroll Days 0 through 3. Also includes paydays and holidays. |
| 2026 Payroll - Free | Payroll dates included. Shows in Outlook as Free all day on Payroll Days 0 through 3. Also includes paydays and holidays. |
| 2026 Payroll AFRS - Free | Payroll and AFRS dates included. Show As Free on Payroll Days 0 through 3. Also includes paydays and holidays. |
| 2026 Payroll AFRS – Busy | Payroll and AFRS dates included. Show As Busy on Payroll Days 0 through 3. Also includes paydays and holidays. |
| 2026 Payroll AFRS ACFR - Busy | Payroll, AFRS, and ACFR dates included. Shows in Outlook as Busy all day on Payroll Days 0 through 3. Also includes paydays and holidays. |
| 2026 Payroll AFRS ACFR - Free | Payroll, AFRS, and ACFR dates included. Shows in Outlook as Free all day on Payroll Days 0 through 3. Also includes paydays and holidays. |
| 2026 Payday and Holiday | Only includes paydays and holidays. |
| 2026 AFRS ACFR Closing Schedule | AFRS and ACFR closing schedule. Also includes paydays and holidays. |
| 2025 Payroll - Busy | Payroll dates included. Shows in Outlook as Busy all day on Payroll Days 0 through 3. Also includes paydays and holidays. |
| 2025 Payroll - Free | Payroll dates included. Shows in Outlook as Free all day on Payroll Days 0 through 3. Also includes paydays and holidays. |
| 2025 Payroll AFRS - Free | Payroll and AFRS dates included. Show As Free on Payroll Days 0 through 3. Also includes paydays and holidays. |
| 2025 Payroll AFRS ACFR - Busy | Payroll, AFRS, and ACFR dates included. Shows in Outlook as Busy all day on Payroll Days 0 through 3. Also includes paydays and holidays. |
| 2025 Payroll AFRS ACFR - Free | Payroll, AFRS, and ACFR dates included. Shows in Outlook as Free all day on Payroll Days 0 through 3. Also includes paydays and holidays. |
| 2025 Payday and Holiday | Only includes paydays and holidays. |
| 2025 AFRS ACFR Closing Schedule | AFRS and ACFR closing schedule. Also includes paydays and holidays. |
If you have questions or require assistance with importing the CSV file into your Outlook calendar, please work directly with your internal agency IT department.
The import calendars are provided anually to OFM by an independent agency. The import calendars are not provided nor supported by OFM, rather we pass the import files to you once they are shared with us.
-
Step 1
Identify and open the CSV calendar option you wish to import to your Outlook Calendar.
-
Step 2
With the calendar CSV file open, take the following steps to save the calendar to your desired location:
- File
- Save As
- Select your desired location
- Save
TIPS:It is recommended to save your CSV file to your desktop.
If you have customized your Outlook Calendar category colors, you must rename the Categories section within the CSV file to match your custom color categories in Outlook.
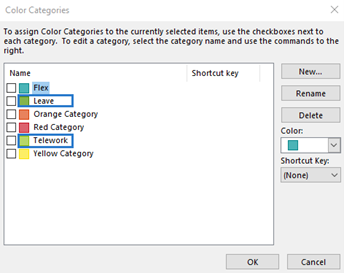
You should also update CSV file categories to match your customized colors.

Upon updating and before closing your CSV file to match your custom Outlook color categories, save your file again to retain your changes.
-
Step 3
Close the CSV file.
TIPS:Failure to close the CSV file will result in an error during the import process.
-
Step 4
In Outlook, open your calendar and select the following:
- File
- Open and Export
- Import/Export

-
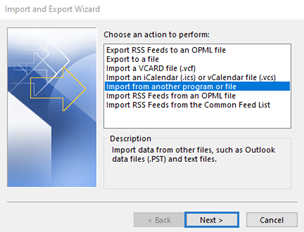
Step 5
Select Import from another program or file and click the Next button.
-
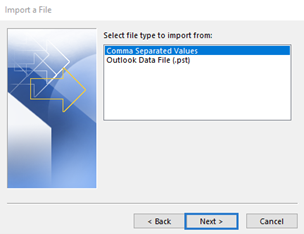
Step 6
Select Comma Separated Values and click the Next button.
-
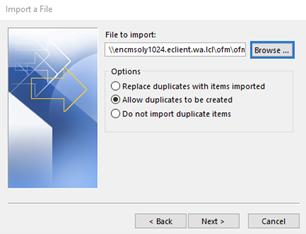
Step 7
In the File to Import box, click the Browse button.
-
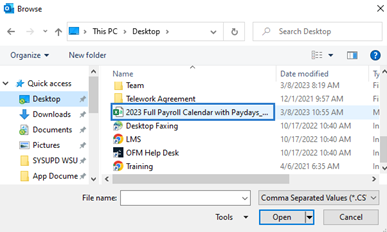
Step 8
Locate your saved CSV file and double-click to select it.
-
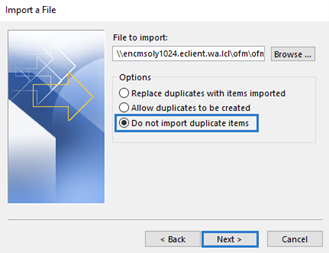
Step 9
In the Options section, click Do not import duplicate items and click the Next button.
-
Step 10
In the Select destination folder section, click on the Calendar file and click the Next button.
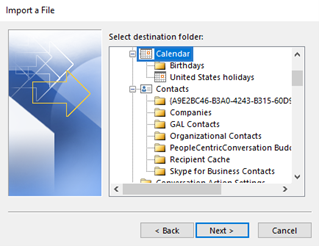 TIPS:
TIPS:The Calendar selection may default as the selected destination folder upon opening.
-
Step 11
Click the Finish button.
 TIPS:
TIPS:You should now see the imported dates on your Outlook calendar. If you do not see the new additions to your Outlook calendar, close Outlook and reopen to populate.