Payroll Threshold Report
Use this report to verify payroll information, or to ensure that employees are set up correctly with payroll master data. Run this report to check for possible payroll issues such as arrears, claims, deductions not taken, missing hours, and pay that is too high or too low. OFM must have stored payroll for the period before you can run this report.
The HRMS Processor Guide recommends running this report at minimum, on Payroll Day 2, however processors can begin using this on the morning of Day 1.
-
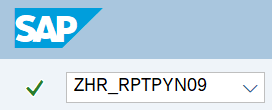
Enter transaction code ZHR_RPTPYN09 in the command field and click the Enter button.
-
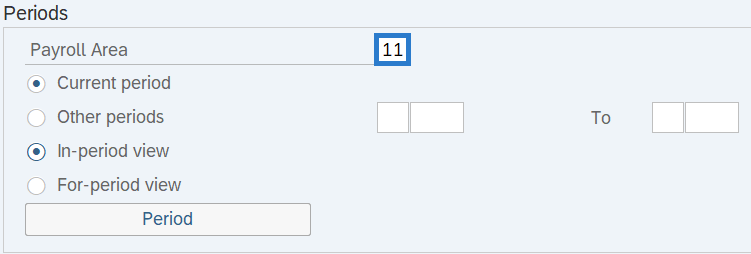
Click the Payroll period button in the Period section.
 Tips:
Tips:Use the Payroll period button to enter one or more pay periods (recommended). However, users can enter the appropriate dates in the Period From and To fields instead.
-
Complete the Periods section.
The following field is required:
- Payroll Area - 11
The following radio buttons will default:
- Current period
- In-period view
 Tips:
Tips:The Periods section will determine the time period of the employees and data that will display in the results.
The state of Washington only uses Payroll Area 11 – Semi-Monthly.
The Current period radio button will default to selected, but can be changed.
When selecting the Other periods radio button, enter a pay period or range of pay periods. For example: 10/2024 to 11/2024.
The In-period view radio button will default to selected. When checked, In-period view will return information for the payroll period in which a payroll result is created.
When selected, the For-period view will return information for which a payroll result is created. In the case of a retro calculation, the For-period will be a prior period than the pay period in which the payroll results were created.
-
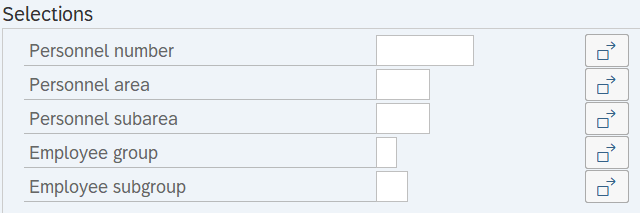
Complete the Selections section.
The following fields are conditional:
- Personnel number
- Personnel area
- Personnel subarea
- Employee group
- Employee subgroup
 Tips:
Tips:The Selections section will assist in getting only the information needed. A selection is not required for each field.
Additional fields can be added to the Selections section using the Further Selections button.
-
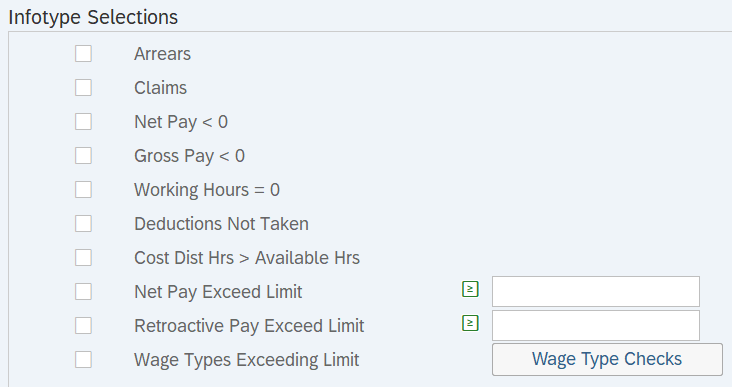
Complete the Infotype Selections section.
The following check boxes are conditional:
- Arrears
- Claims
- Net Pay < 0
- Gross Pay < 0
- Working Hours = 0
- Deductions Not Taken
- Cost Dist Hrs > Available Hrs
- Net Pay Exceed Limit
- Retroactive Pay Exceed Limit
- Wage Types Exceeding Limit
 Tips:
Tips:The Infotype Selections section will assist in getting only the information needed.
Select one or more check boxes.
- Arrears: Choose this selection to check for employees who do not have enough money for retirement and health deductions to be taken in full for the current pay period. The remaining amount will be placed into arrears.
-
Claims: Choose this selection to check for employees who have claims due and do not have enough money to cover deductions.
-
Net Pay < 0: Choose this selection to check for employees whose net pay is less than 0.
-
Gross Pay < 0: Choose this selection to check for employees whose gross pay is less than 0.
-
Working Hours = 0: Choose this selection to check for employees who do not have any work hours entered for the pay period.
-
Deductions Not Taken: Choose this selection to check for employees who do not have enough money for all deductions to be taken.
-
Cost Dist Hrs > Available Hrs: Choose this selection to check for hours that have been entered for an employee which are greater than the actual hours for the pay period.
-
Net Pay Exceed Limit: Choose this selection to check for employees who have net pay that exceeds the defined amount. Enter a net pay amount in the Define Selection field.

The field will default to the Greater Than or Equal To selection value. Double click the field to change the selection value to Single Value, Less Than or Equal To, Greater Than, Less Than, or Not Equal To.
-
Retroactive Pay Exceed Limit: Choose this selection to check for employees who have retroactive pay that exceeds the defined amount. Enter a retroactive pay amount in the Define Selection field.

The field will default to the Greater Than or Equal To selection value. Double click the field to change the selection value to Single Value, Less Than or Equal To, Greater Than, Less Than, or Not Equal To.
-
Wage Types Exceeding Limit: Choose this selection to check for employees with specified wage types and amounts. Click the Wage Type Checks button to enter wage type and amount information.

-
Click the Execute button.
Sample report results:

Sample report results displaying Pers to Rate columns. Click to expand.

Sample report results displaying Org Unit to Wage Type Text columns. Click to expand.
Tips:Columns included in the report results depend on your default layout for this report. The report layout can be changed, saved or a previously saved layout can be selected.
The full column names will display when hovering the cursor over the column headings.
Scenarios
Below are examples of running the Payroll Threshold report. This is not a comprehensive list of every scenario.
Example 1 - Search for Claims.
In this scenario, I have discovered that an employee has a /561 claim in the current period. As a payroll processor, I am going to further investigate the employee's master data and make necessary updates. If not corrected, this claim will cause an ALAS error since the claim is in the current period and there will not be enough pay to process a retro reduction in the next period.
On the report selection screen:
Example 2 - Search for Arrears and Deductions Not Taken.
In this scenario, I have an employee who has been out on leave without pay. As a payroll processor, I am going to check for arrears and deductions not taken.
On the report selection screen: