Appointment Change Action (PA) - In-Training Complete
Use this procedure when an employee completes their in-training appointment or completes a level in a multiple level in-training appointment and there is a change to the employee’s job, appointment date, or pay.
Refer to the In-Training Appointments Coding Reference Guide for additional information on correctly coding in-training appointments and completions.
If there is no change to the employee’s job, appointment date, or pay, then use the Change of Status Action procedure instead.
This action does not normally require hand-offs to other roles; however, a hand-off may be necessary if there is also a change to the employee's work county or Workers' Compensation risk classification. If changes are necessary, notify your payroll office so they can update the employee's:
- Work county (Worksite on the Unemployment State (0209) infotype)
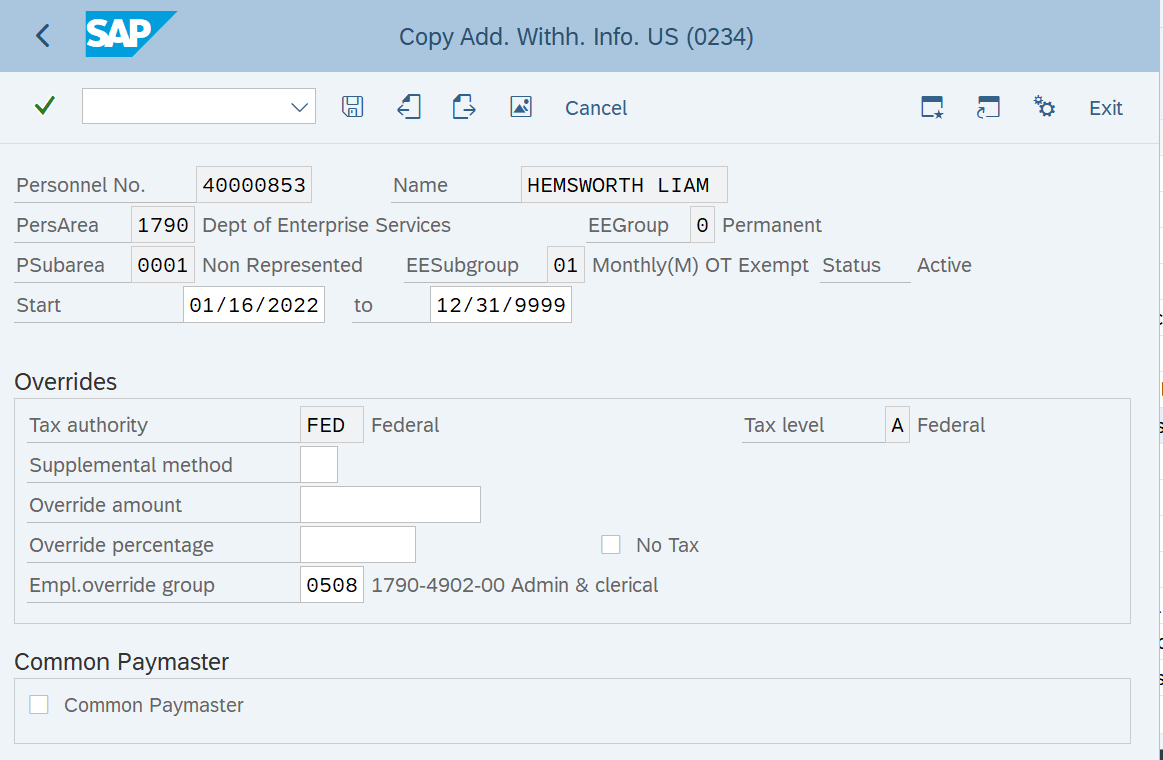
- Workers' Compensation risk classification (Empl.override group on the Add. Withh. Info. US (0234) infotype)
Be sure to communicate with your payroll processor before entering a retroactive action.
-
Step 1
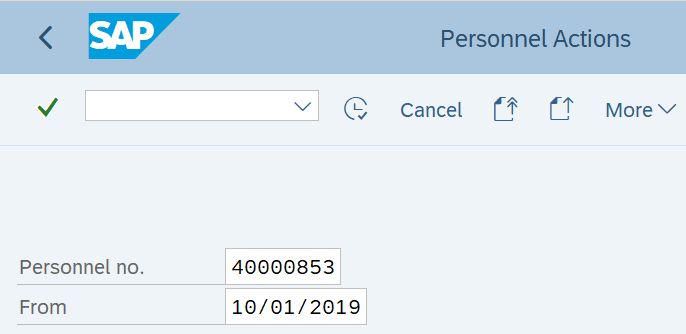
Enter transaction code PA40 in the command field and click the Enter button.
-
Step 2
Complete the following fields:
- Personnel no.
- From
-
Step 3
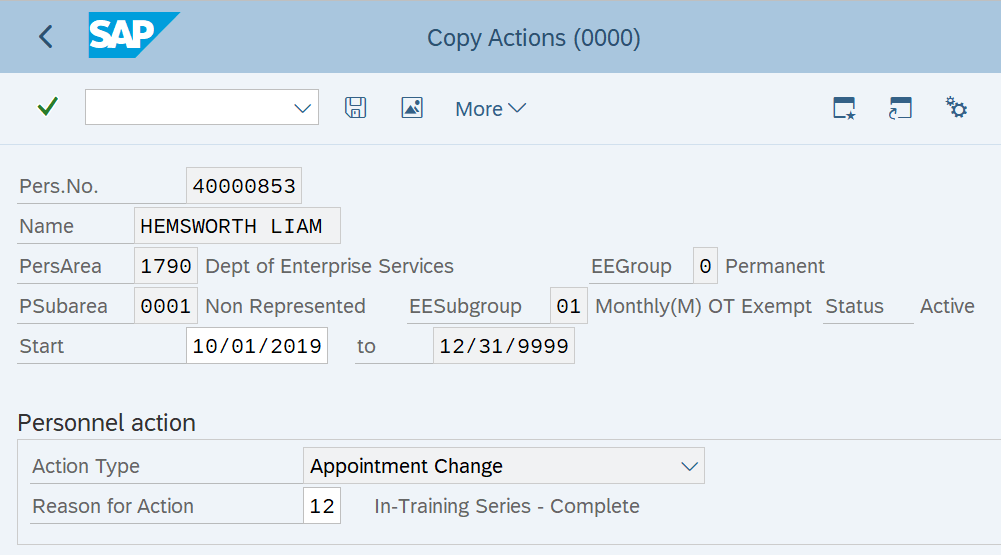
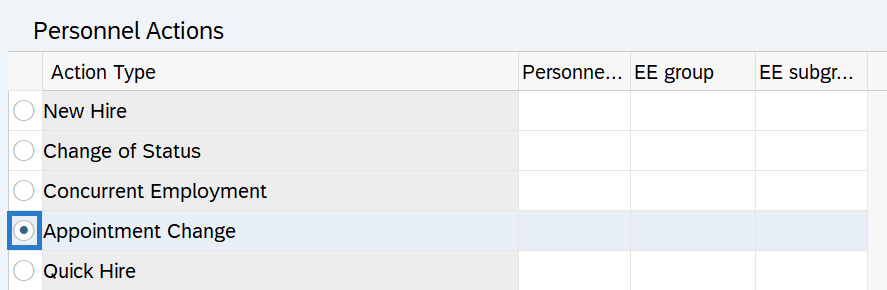
Under Personnel Actions, select the Appointment Change radio button.
-
Step 4
Click Enter to populate the the employee information.
-
Step 5
Click the Execute button.
-
Step 6TIPS:
The reason for action should be In-Training Level - Complete or In-Training Series - Complete.
-
Step 7
Click the Enter button to validate the information.
-
Step 8
Click the Save button.
-
Step 9TIPS:
If the employee’s job does not reflect the job classification they are moving into, then your organizational management processor will need to maintain the job-to-person relationship(s) as necessary.
- To end an existing job to person relationship, refer to the Job to Person Relationship – (In-Training Plan Completed) procedure.
- If the employee is completing an in-training level and a new job to person relationship needs to be created, refer to the Job to Person Relationship – (Estab. In-training Plan) procedure.
-
Step 10
Click the Enter button to validate the information.
-
Step 11
Click the Save button.
-
Step 12
Complete the Contract Elements (0016) infotype.
The following field is mandatory:
The following field is optional:
- Probationary Period
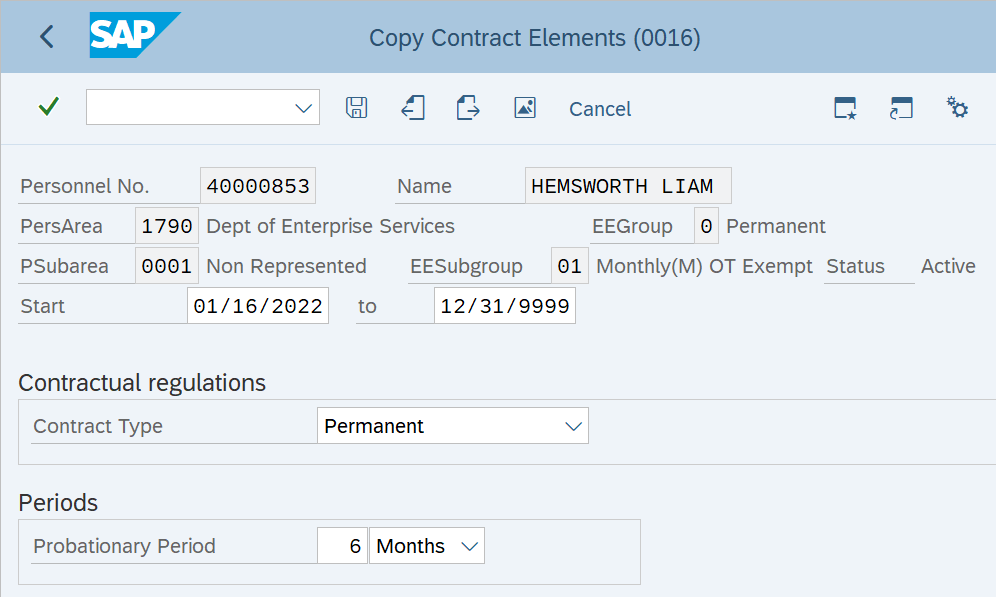 TIPS:
TIPS:If the Probationary Period field is left blank, the Create Monitoring of Tasks (0019) infotype is skipped. Go to Step 15.
-
Step 13
Click the Enter button to validate the information.
-
Step 14
Click the Save button.
-
Step 15
Complete the Monitoring of Tasks (0019) infotype.
The following fields are mandatory:
- Task Type
- Date of Task
- Processing Indicator
The following fields are optional:
- Reminder Date
- Lead/follow-up time
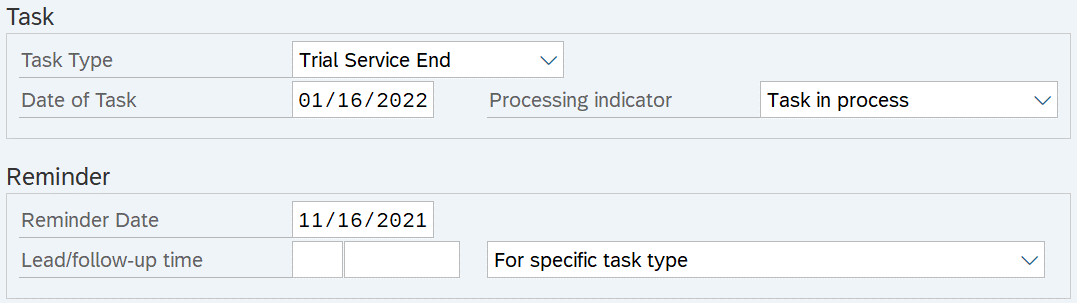 TIPS:
TIPS:This step creates a new Monitoring of Tasks (0019) record and only one task can be created during this action.
- If an existing Monitoring of Tasks record needs to be maintained for the employee, refer to the Monitoring of Tasks - Update Status or Extend Record procedure.
- If additional tasks need to be created, refer to the Monitoring of Tasks - Create New Record procedure.
The Reminder Date field can be completed by one of the following:
- Enter a Reminder Date, or
- Enter the Lead/follow-up time. The Reminder Date field will populate based on what was entered in the Lead/follow-up time field, or
- Leave the Reminder Date and Lead/follow-up time blank. The Reminder Date field will populate with a date two months prior to the Date of Task.
Run the Task Monitoring Report (S_PH0_48000450) to get the reminder dates and task dates for the tasks entered on this infotype.
-
Step 16
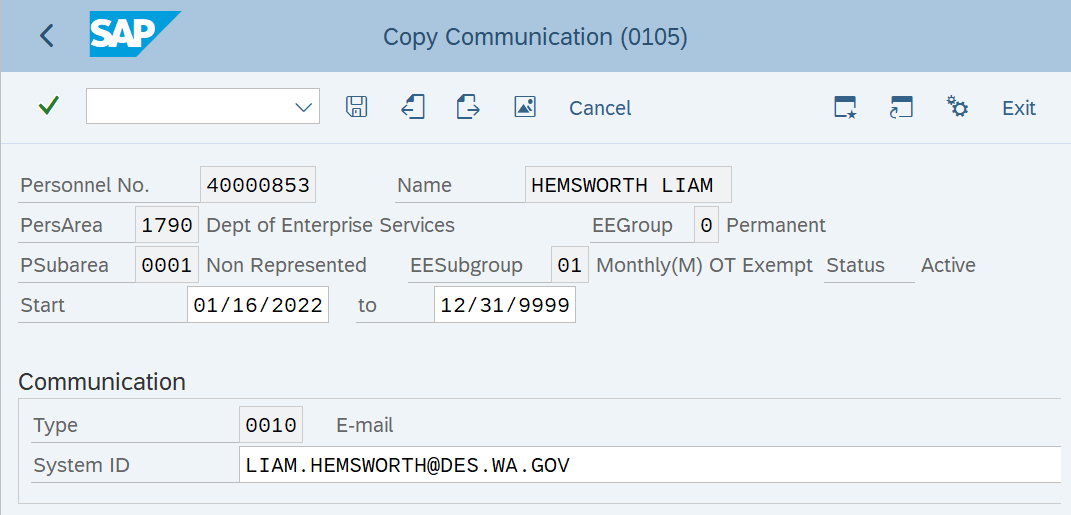
Review the Communication (0105) infotype and make any necessary updates. If no changes are needed click the Next Record button and skip to step 19.
The following field is mandatory:
- System ID
-
Step 17
Click the Enter button to validate the information.
-
Step 18
Click the Save button.
-
Step 19
Review the Planned Working Time (0007) infotype and make any necessary updates. If no changes are needed click the Next Record button and skip to step 22.
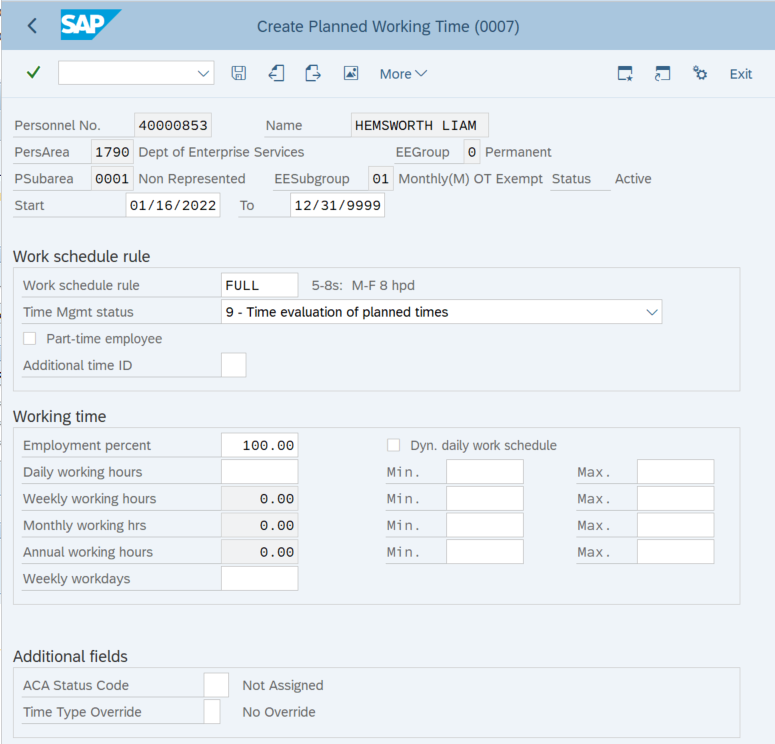
-
Step 20
Click the Enter button to validate the information.
-
Step 21
Click the Save button.
-
Step 22
Review the Telework/Flex Work (Employee) (9106) infotype and make any necessary updates. If no changes are needed click the Next Record button and skip to step 25.
 TIPS:
TIPS:Employees should have an active Telework/Flex Work (Employee) record. Refer to the HRMS Data Definitions Resource Guide for more information on how this data is used.
-
Step 23
Click the Enter button to validate the information.
-
Step 24
Click the Save button.
-
Step 25
Complete the Date Specifications (0041) infotype.
The following field is mandatory for each Date type:
- Date
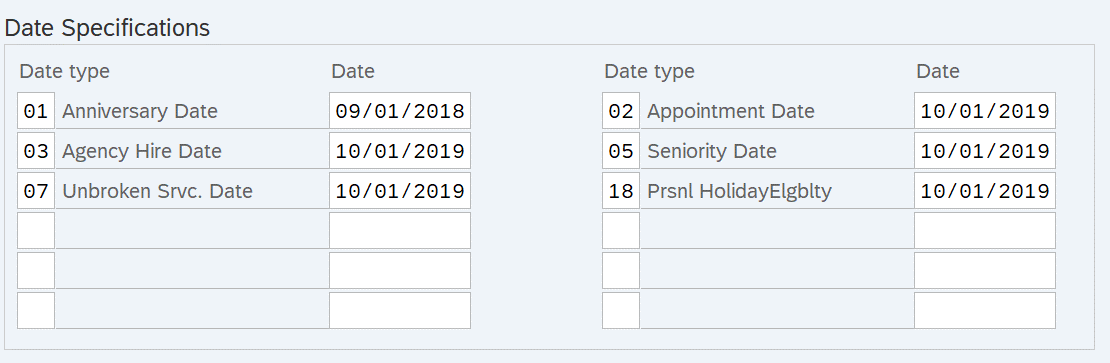 TIPS:
TIPS:When the employee moves to a new job classification, their Appointment Date should be changed,
In HRMS, you are limited to 12 date types for each record.
-
Step 26
Click the Enter button to validate the information.
-
Step 27
Click the Save button.
-
Step 28
Complete the Basic Pay (0008) infotype.
For employees who are indirectly valued, the following fields are mandatory:
For employees who are directly valued, the following fields are mandatory:
- Reason
- Wage type Amount or Ann.salary
For all employees, the following fields will default. Ensure the default values are accurate and make changes if necessary:
- PS Type
- PS Area
- PS Group
- Level
- Cap.util.lvl
- WkHrs/period
- Wage Type
- Ind.val.
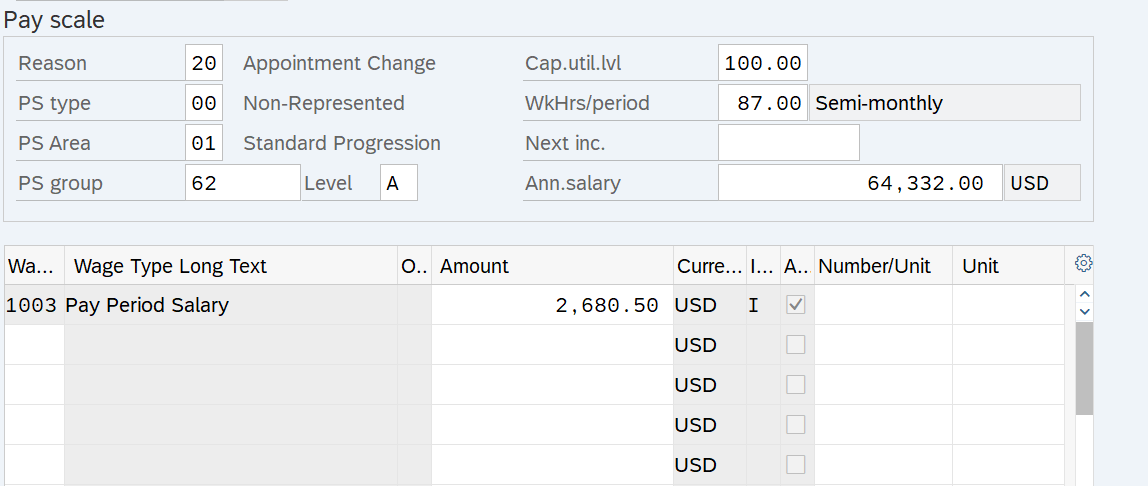 TIPS:
TIPS:The employee's Cap.util.lvl and WkHrs/period fields will default based on the employee's Planned Working Time (0007) infotype.
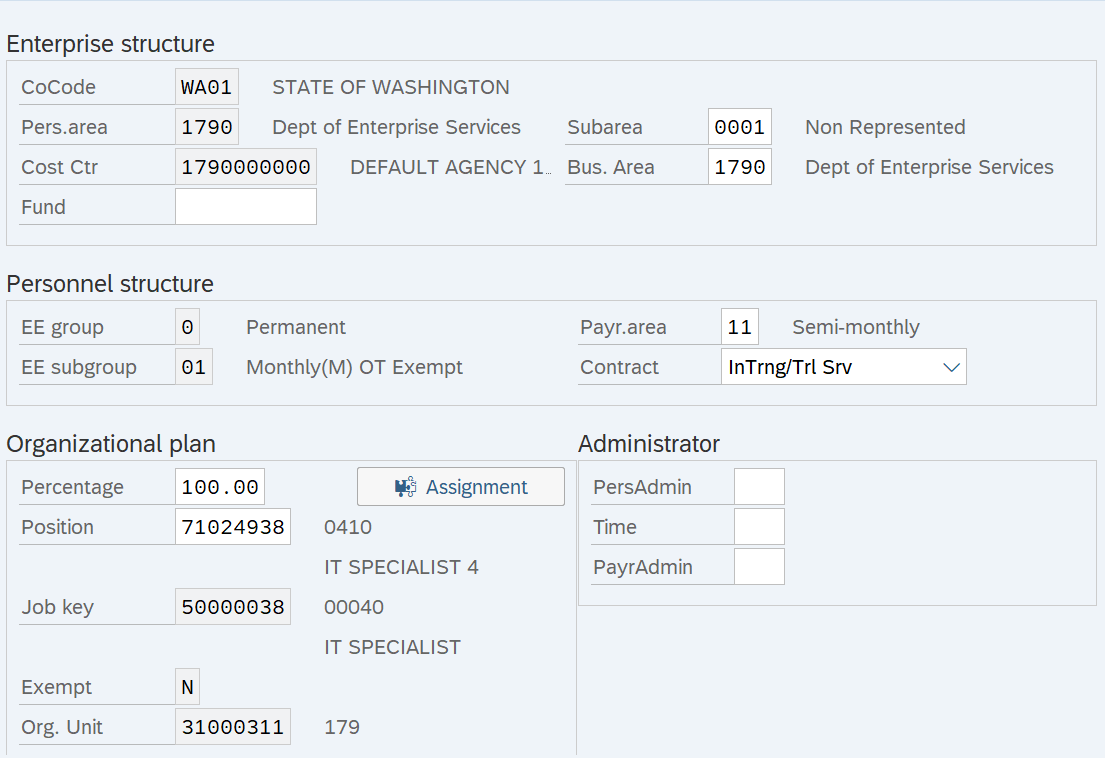
The employee’s pay scale / pay grade fields will default based on the employee’s position Planned Compensation (1005) infotype. The PS group should match the Pay Scale Group or Pay Grade of the job the employee is assigned. If the employee’s job is different than the position’s job, such as an in-training appointment, then change the PS Group to match the Pay Scale Group or Pay Grade of the job they are assigned. For more information on coding in-training appointments, refer to the In-Training Appointments Coding Reference Guide.
Next inc. is the date an employee is scheduled to move to a higher salary step within the salary range of their current job class. This field is used as an override when there are exceptions to the rules built into the system, or if an agency prefers to manually enter this date. If no date is entered, the system will follow the Automated PID Process.
Manually enter the next increase date during the Appointment Change - In-Training Complete action if the employee is moving to a new salary range (PS group), to ensure the employee receives their periodic increment on the correct date.
Ind.val. indicates whether an employee’s pay is indirectly valued or directly valued.
- Indirectly valued pay is derived from a salary schedule table and will automatically update when the salary schedule tables are changed. Enter the PS group and Level fields and the system will populate the wage type Amount and Ann.salary fields based on the salary schedule.
- Directly valued pay is manually entered into the wage type Amount (recommended) or Ann.salary fields.
The wage type will default based on the employee’s Employee Subgroup. Wage type 1003 is used for monthly, wage type 1001 is used for hourly, and wage type 1006 is used for daily. Enter the correct wage type if the field is blank. You can also enter wage types for additional pay, such as shift premium and assignment pay.
-
Step 29
Click the Enter button to validate the information.
-
Step 30
Click the Save button.
TIPS:After the Basic Pay (0008) infotype is saved, the Add. With. Info US (0234) infotype will automatically populate. The personnel administration processor has inquiry access only and does not have the ability to save this infotype.
Stop:This marks the end of the action. After saving, click the Exit button. Notify the payroll office if there are any changes they need to enter for the employee, such as change in work county or Workers' Compensation risk classification.