Payroll Posting Report
Use this report to check for accounting or funding transactions for payroll. The report reads payroll posting data after it has been processed and interfaces with the ALAS (financial) program. OFM must have stored payroll for the period before you can run this report.
The HRMS Processor Guide recommends running this report on Payroll Days 1-3, however processors can use this report at any time to view payroll posting information.
This report can be run when the agency’s payroll office has completed an off-cycle reversal in which employee(s) warrants or EFT payments are canceled due to errors or discrepancies.
This report can assist in reconciliation of General Ledger Accounts (GLs) 1324, 5124, 5145, 5180, 5181, 5183, 5187, 5189, and 5199.
This report can be run on Day 1, Day 2, and Day 3 to check for accounting or funding discrepancies, as well as to audit LNI codes to ensure they are coded to your agency. You will need to enter the Run ID and Sequence number which can be found at the top left of the Payroll Cutoff Error file. Refer to the Payroll Cutoff Errors page for more information on correcting payroll errors.
The following statewide variants are available for the Payroll Posting report:
- SWV EXP BY WT – Salaries only sorted by WT
- SWV GL 5124 – Net pay and ded for GL 5124
- SWV GL 5180 – PFML Deductions
- SWV GL 5181 – Health Insurance deductions
- SWV GL 5187 – Med Aid/Ind Ins deductions
- SWV GL 5189 – Writ of Garnishment GL 5189
- SWV MEDAID/IND – Recon for hrs and amount
- SWV REV NETPAY – Warrant & EFT Cancellations
Refer to the Statewide Variant List for more information.
Because this report reads posting data after it has been processed and interfaced with the ALAS (financial) program, not all retroactivity is captured. If the retro changes did not affect posting information or took place after payroll was stored, then this report will not display the updated information.
The report will limit results to three million records. This limit improves run times for large agencies and makes it easier for users to filter data using the selection screen options.
-
Enter transaction code ZHR_RPTPY126 in the command field and click the Enter button.
-
Complete the Payroll Period section.
The following fields are required:
- Payroll Area - 11
- Pay Period
The following field is optional:
- Pay Period to
 Tips:
Tips:The Payroll Period section will determine the time period of the employees and data that will display in the results.
The state of Washington only uses Payroll Area 11 – Semi-Monthly.
You can view results from multiple pay periods by entering a period in the To field.
Large agencies should only run one pay period at a time or ensure they are running this report in the background.
-
Complete the Select by Person section.
The following fields are optional:
- Personnel Number
- Organizational Unit
 Tips:
Tips:The Select by Person section will assist in getting only the information needed. A selection is not required for each field.
-
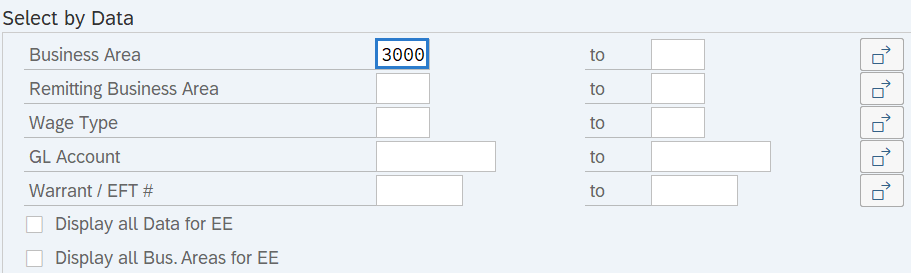
Complete the Select by Data section.
The following field is required:
- Business Area
The following fields are optional:
- Remitting Business Area
- Wage Type
- GL Account
- Warrant / EFT #
The following checkboxes are optional:
- Display all Data for EE
- Display all Bus. Areas for EE
 Tips:
Tips:The Select by Data section will assist in getting only the information needed. A selection is not required for each field.
If the Select by Person section was left blank in Step 3 above, then you must enter at least one of the following before executing the report or a warning message will display:
- Business Area
- Remitting Business Area
When using the GL (General Ledger) Account selection:
- This selection does not accommodate a matchcode search option and must be manually entered.
- A full 10-digit GL Account contains Object, Subobject, and Sub-subobject codes.
- GL Accounts entered must be 10 characters long or contain an asterisk (*). For example:
- If you want to see anything processing for cash expenditures/expenses, enter 6510* into the GL Account selection.
- If you want to see anything processing for cash expenditures/expenses related only to salaries, enter 6510A* into the GL Account selection.
- A comprehensive list of GL Account codes can be found within section 75.40 – General Ledger Account Codes of the State Administrative and Accounting Manual (SAAM).
- A comprehensive list of Object, Subobject, and Sub-subobject codes can be found within section 75.70 – Object/Subobject/Sub-subobject Codes of the SAAM.
-
Complete the Document section if it is Day 1, Day 2, or Day 3 of payroll processing.
The following field is conditional:
- Run ID
 Tips:
Tips:The Run ID can be found at the top of the Payroll Cutoff Error file. Refer to the Payroll Cutoff Errors page for more information on correcting payroll errors.
A Run ID number is only required on Day 1, Day 2, or Day 3 for the current period. This field can be left blank once payroll has been exited or if you are running a previous period.
-
Complete the Sequence section if it is Day 1, Day 2, or Day 3 of payroll processing and you are running the report for the current period.
The following field is conditional:
- Sequential Number
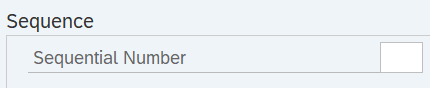 Tips:
Tips:The Sequential Number can be found at the top of the Payroll Cutoff Error file. Refer to the Payroll Cutoff Errors page for more information on correcting payroll errors.
A Sequential number is only required on Day 1, Day 2, or Day 3. This field can be left blank once payroll has been exited.
-
The following fields are optional:
- ALV Layout Variant
- Limit: Do Not Exceed (Records)
The following checkbox will default:
- Apply Filter From ALV Variant
The following button is available:
- Support Hub: Tips for faster run times
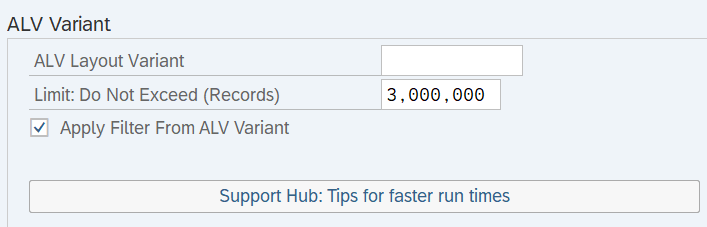 Tips:
Tips:An ALV variant name is not required. Leaving this field blank will result in a default layout for this report.
The following options are available:
- Limit: Do Not Exceed (Records): Select this option to limit the number of records that will appear in the report results. The report will only return results for three million records – exceeding this number will cause HRMS to eventually time out.
- Apply Filter From ALV Variant: Select this option to set a filter limiting the amount of data retrieved.
- Support Hub: Tips for faster run times: Select this button to view the report procedure directly from HRMS. For faster run times, consider the following tips:
- Only pull the data you need.
- If you regularly need the same data, build a variant and/or layout that suits your needs and does not contain unnecessary data.
- Consider running the report in the background.
- If you are timing out, consider narrowing the time period. For example, if you are timing out while pulling a quarter, consider narrowing your report to one month at a time and compiling the data outside of HRMS.
- Use the Save the Excel file directly to local drive option outlined in Step 8. This option will bypass run time and save the file directly to your PC.
-
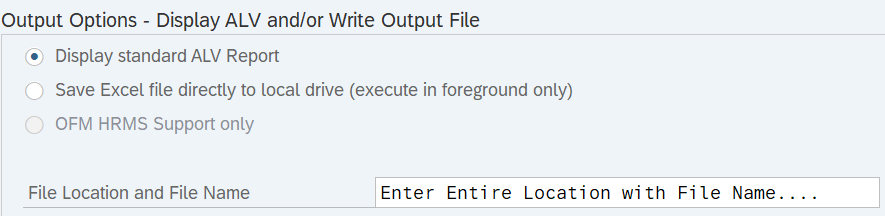
The Output Options – Display ALV and/or Write Output File section is mandatory.
The following radio button will default:
- Display standard ALV Report
The following radio button is available:
- Save Excel file directly to local drive (execute in foreground only)
 Tips:
Tips:The Output Options section determines the format of the report results.
The Display standard ALV Report option will display report results in ALV format.
The Save the Excel file directly to local drive option will download the report results as an Excel spreadsheet. Selecting this option requires a file name and the location where you want to save the file to your computer. This option is recommended for larger reports as it decreases the amount of time HRMS needs to export large sets of data.
The OFM HRMS Support only section is only available for OFM HRMS technical team. If the report you are attempting to execute receives an error due to time limits after attempting the Save Excel file directly to local drive, you may send a detailed request outlining the data you are attempting to retrieve to Heretohelp@ofm.wa.gov so that OFM can assist in extracting the large data set for you. Your request must include all your report selection criteria, plus any variants or layouts you may need.
-
Execute the report.
Sample report results:
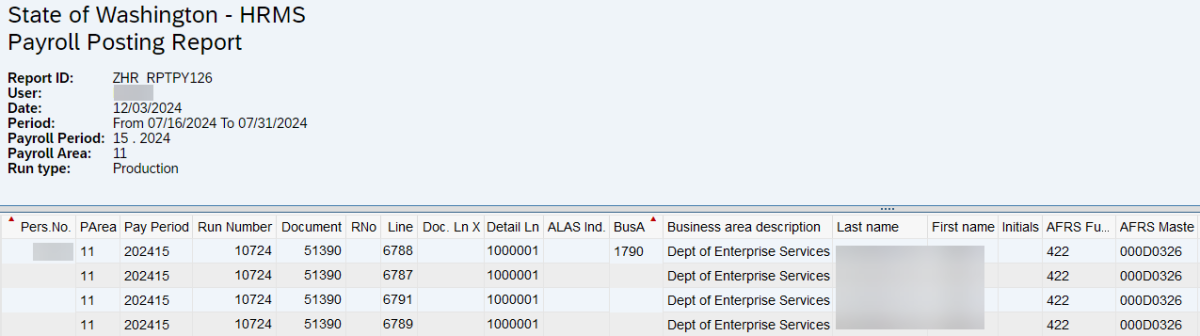
Sample report results. Click to expand.

Report results displaying AFRS App to Amount columns. Click to expand.

Report results displaying Retro to Object name columns. Click to expand.

Report results displaying Warrant # to Auth Description columns. Click to expand.
Tips:Columns included in the report results depend on your default layout for this report. The report layout can be changed, saved or a previously saved layout can be selected.
The full column names will display when hovering the cursor over the column headings.
The EID Number column only returns the Federal EID for every row. It does not include the state or local EID Numbers.
Example Scenarios
Below is an example of running the Payroll Posting report. It is not a comprehensive list of every scenario.
Example - Audit General Ledger (GL) 1324.
In this scenario, I have been tasked with reconciling GL 1324 for the month of July 2025. As a payroll processor, I first ran a report from Enterprise Reporting. I am now going to run the Payroll Posting report to check the results against HRMS: