Reference Personnel Numbers Report
Use this report to identify employees who have a reference personnel number. This report displays the employment status as well as the employee subgroup assigned to each personnel number.
There are specific scenarios where an employee may have more than one personnel number. The multiple personnel numbers are linked through the Reference Personnel Numbers (0031) infotype. This infotype is created (or changed) during the Concurrent Employment Action.
A concurrent Employment Action is performed when an employee will work in two different personnel areas or will work in the same personnel area but assigned two different employee subgroups (one monthly and one hourly).
A reference personnel number may also be created when a former state employee who was not converted into HRMS is hired without knowledge of an existing legacy personnel number. If the agency finds out the employee had a legacy personnel number after they have already been paid in HRMS, they may create a Reference Personnel Numbers (0031) infotype using the legacy personnel number.
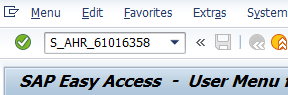
Enter transaction code S_AHR_61016358 in the command field and click the Enter button.
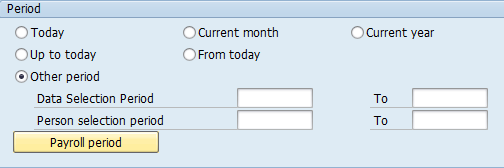
Complete the Period section.
The following radio buttons are available for selection:
- Today
- Current month
- Current year
- Up to today
- From today
- Other period
 Tips:
Tips:The Period section will determine the time period of the employees and data that will display in the results.
The Other period radio button will default to selected. Use the Data Selection Period and Person selection period date fields when the Other period radio button is selected.
Use the Payroll period button to enter a payroll period for your date selection instead.
Use F1 Help in each Period selection field to find out what each date selection option means.
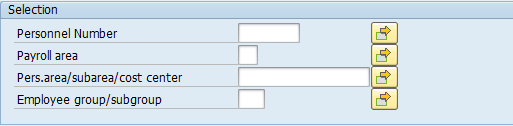
Complete the Selection section.
The following fields are optional:
- Personnel Number
- Payroll area
- Pers.area/subarea/cost center
- Employee group/subgroup
 Tips:
Tips:The Selection section will assist in getting only the information needed. A selection is not required for each field.
Additional fields can be added to the Selection section using the Further selections button.
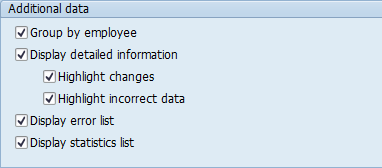
Complete the Additional data section.
The following fields will default to selected:
- Group by employee
- Display detailed information
- Highlight changes
- Highlight incorrect data
- Display error list
- Display statistics list
 Tips:
Tips:The Additional data section will assist in formatting the report results.
All boxes in this section default to checked, but can be changed based on your needs.
Click the Execute button.
Sample report results:
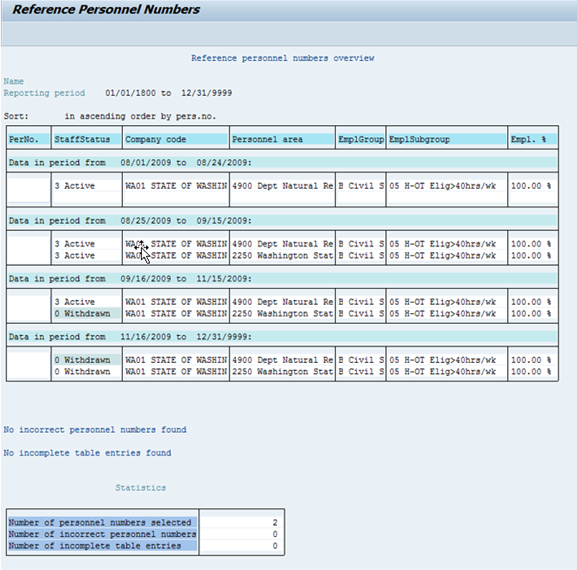 Tips:
Tips:The report results will vary depending on the selections made in the Additional data section on the report selection screen.
The following table maps each field to the infotype: