Show Retroactivity by Personnel Area
Use this report to view all retroactivity organized by personnel area for the current and/or prior pay periods.
Use this report to see how many employees had retroactivity during a given pay period, or to get detailed information about what may have caused the retroactivity for an employee.
Stored payroll results are required for retroactivity to appear in the report results.
-
Enter transaction code ZHR_RPTPYU30 in the command field and click the Enter button.
-
Complete the Payroll Period section. The following fields are required:
- Payroll Area
- Payroll Period
The following check box will default:
- Use Current Period
 Tips:
Tips:The Payroll Period section will determine the time period of the employees and data that will display in the results.
The state of Washington only uses Payroll Area 11 – Semi-Monthly.
The report will default to the current pay period; uncheck the Use Current Period check box to change the report to a different period.
-
Complete the Selection Criteria section.
The following fields are optional:
- Business Area
- Personnel Area
- Personnel Number
 Tips:
Tips:The Selection Criteria section will assist in getting only the information needed. A selection is not required for each field.
-
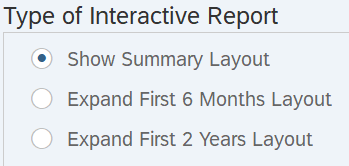
Select one of the following radio buttons:
- Show Summary Layout
- Expand First 6 Months Layout
- Expand First 2 Years Layout
 Tips:
Tips:The radio buttons will default to Show Summary Layout (recommended). This selection provides a high level overview of the retroactivity, although you can click on a period to get more details.
The following radio buttons are available for selection:
- Expand First 6 Months Layout : Choose this selection to view six months’ worth of individual pay periods. Click on a period to get more details.
- Expand First 2 Years Layout: Choose this selection to view two years’ worth of individual pay periods. Click on a period to get more details.
-
The following field is optional:
- ALV Layout Variant
 Tips:
Tips:A Layout Variant is not required. Leaving this field blank will result in a default layout for this report.
-
Click the Execute button.
Sample initial report results:

Sample initial report results. Click to expand.
Tips:The following columns are available for selection on the initial report results screen:

Initial report results columns. Click to expand.
- Total: Choose this selection to view the number of employees processed in the selected payroll period.
- Current: Choose this selection to view the number of employees processed in the selected payroll period who did not have retroactivity.
- 3 Months: Choose this selection to view the number of employees processed in the selected payroll period with retroactivity equaling 3 months or less.
- >3 Months: Choose this selection to view the number of employees processed in the selected payroll period with retroactivity greater than 3 months.
- >6 Months: Choose this selection to view the number of employees processed in the selected payroll period with retroactivity greater than 6 months.
- >1 Year: Choose this selection to view the number of employees processed in the selected payroll period with retroactivity greater than 12 months.
- >2 Years: Choose this selection to view the number of employees processed in the selected payroll period with retroactivity greater than 24 months.
-
Click on a report cell to examine details of retroactivity within the desired number of months/years.
In this example, if you click on the cell in the 3 Months column, you will see detailed information about two employees who had retroactivity in the past three months.

Retroactivity columns. Click to expand.
-
Click on a report cell to examine details of each employee’s retroactivity.
Sample detailed report results:

Sample report results. Click to expand.
Tips:Detailed report results allow you to further examine areas of interest when you are uncertain of what may have triggered the retroactivity.
The following tools will assist in determining what may have caused the retroactivity for an employee:

Retroactivity tool icons. Click to expand.
- Personnel Number: Select a personnel number in the field to open PA20 (Display HR Master Data).
- Show HR Master Data: Select the View button in the field to open PA20 (Display HR Master Data).
- Audit Log: Select the View button in the field to open the Logged Changes in Infotype Data report (S_AHR_61016380).
- Display Pay Results: Select the Results icon in the field to open the Display Payroll Results report (PC_PAYRESULT).
- Payroll Posting Rpt: Select the Report icon in the field to open Payroll Posting report (ZHR_RPTPY126). This report will return results for any pay period after payroll has been completed and posted. If you want to run the report for the current period before Day 4, you will need to complete the Run ID and Sequential Number fields.