Substitute Admin Transaction - Create New Substitute Relationship
Use this procedure to create a new MyPortal Substitute relationship. Creating a new substitute relationship is necessary when a leave approver is out of the office or unable to approve leave and requires another supervisor to approve leave on their behalf.
It is recommended that substitutes be at a level above the supervisor within the org unit hierarchy structure, and that all supervisors assign at least one Unplanned Substitute to ensure someone has the ability to approve leave in their absence.
If a supervisor creates a substitute within MyPortal, they are limited to selecting a substitute above them within their organizational unit hierarchy. If a processor creates a substitute using the Substitute Admin Transaction, they are limited to selecting a substitute within their agency Business Area.
If an absent supervisor has not assigned a Planned or Unplanned Substitute while they are out of the office for an extended period, the Personnel Administration Processor or Payroll Processor may:
- Create a substitute relationship using the steps below, allowing a designee to approve requests on behalf of the supervisor/manager; or
- Request the submitting employee delete their pending request from MyPortal and the Time and Attendance processor may utilize HRMS CATs to process Absences manually.
Before beginning this procedure, you should have the 8-digit personnel numbers and the names of the supervisor and the substitute. Substitutes can only be created within HRMS if both employees share the same business area.
-
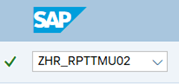
Step 1
Enter transaction code ZHR_RPTTMU02 in the command field and click the Enter button.
-
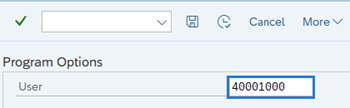
Step 2
Complete the following field:
- User
 TIPS:
TIPS:Enter the 8-digit personnel number of the supervisor or manager you are creating the substitute relationship for.
-
Step 3
Click the Execute button.
-
Step 4
In the Name section of the Personal Substitutes box, click directly on the employee’s name to select.
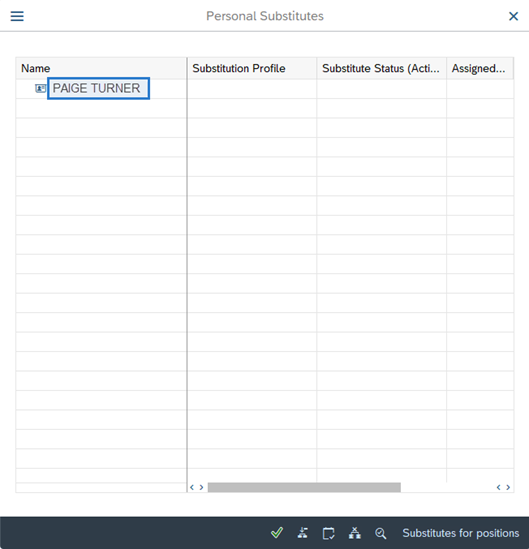 TIPS:
TIPS:The name should be highlighted. If the name is not highlighted, you will receive a message stating “Position the cursor correctly”.
-
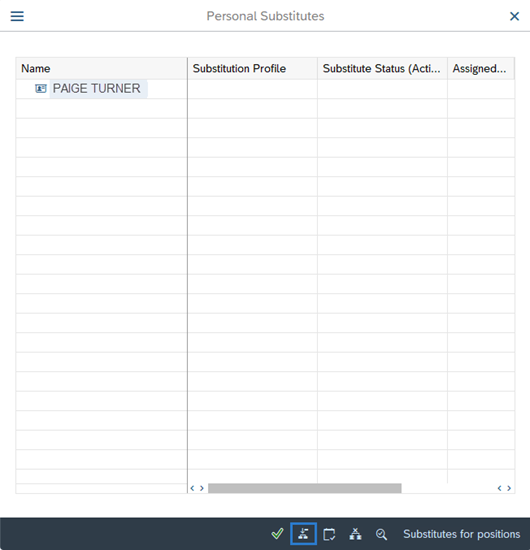
Step 5
Click the Create Substitute button.
-
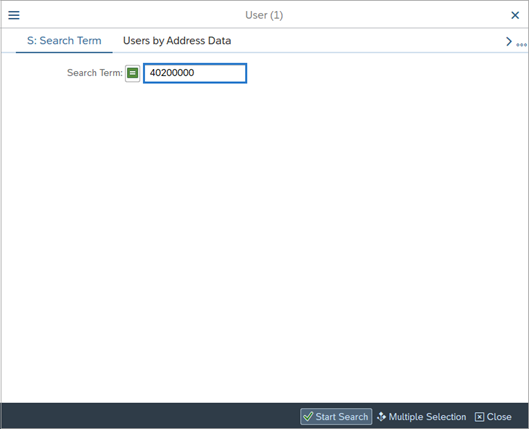
Step 6
In the Search Term box, enter the Personnel Number of the employee designated as the substitute.
 TIPS:
TIPS:If you are uncertain of the substitute’s 8-digit personnel number, you can also search by name within the Search Term Box.
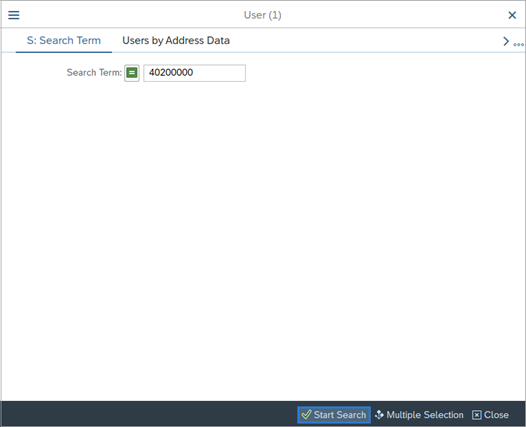
-
Step 7
Click the Start Search button.
-
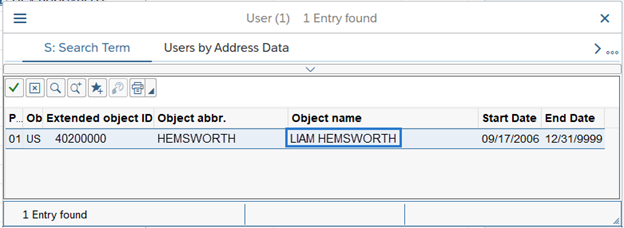
Step 8
Verify that the correct substitute is listed in the User box. Once verified, double click directly on the Object Name to select.
 TIPS:
TIPS:If you have entered and selected a personnel number of someone who does not belong to the same business area, you will receive an error stating “ERROR: You are not authorized to user PRNR XXXXXXXX as a substitute. ERROR: You cannot save the choice. Please review your selection and retry! Click check box below to proceed”. If you receive this error, accept the error, and then enter the correct 8-digit personnel number within your business area. Do not attempt to create a substitution relationship outside of your business area.
-
Step 9
In the Detail Screen Substitution box, complete the following fields:
The following fields are mandatory:
- Validity
- To
The following field is conditional:
- Substitution active
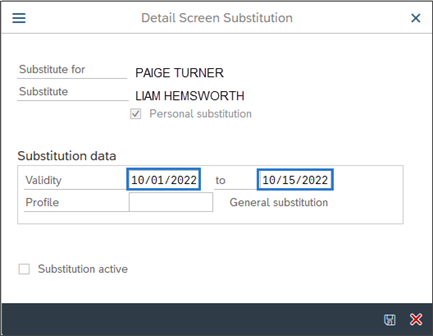 TIPS:
TIPS:The Validity date should be set to the date the substitution is to begin.
The To date:
- For a planned substitute, enter the date the substitution should end.
- For an unplanned substitute, enter 12/31/9999.
The Substitution active box should never be used for unplanned substitutes. If used for unplanned substitutes, the substitute will continue to get emails for leave approval even after the substitution has ended. Select the Substitute active box only if this action is for a planned substitute and you wish to immediately activate the substitute relationship. Otherwise, direct substitutes to activate their own substitute by using the MyPortal – turn substitute for option on and off user procedure.
-
Step 10
Click the Save button.
-
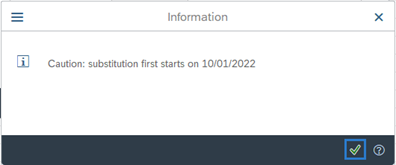
Step 11
Validate any system messages in the Information box and click the Continue button.
 TIPS:
TIPS:You have completed creating a new MyPortal substitute relationship. Processors should refer to the MyPortal Substitution Report to monitor substitute relationships within your agency. If you did not activate the substitute relationship, notify the substitute that they will need to follow the MyPortal – Turn Substitute for Option on and off to turn on the substitution.