Payroll Simulation – Process Garnishments
Use this report to identify garnishments that are processing in the pay period.
Use this report procedure to view simulated payroll after a change to an employee’s master data to validate or correct the changes. Running a pay sim allows you to view the outcome of any changes before the next stored payroll results.
This report describes the key sections of a payroll simulation that should be reviewed during payroll processing. Since payroll simulations contain a lot of data, there may be sections with useful information that are not covered in this procedure.
This procedure shows how to read the payroll simulation results. Refer to other Payroll Simulation procedures for information on completing the report selection screen or other specific tasks.
Questions regarding garnishments should be directed to the Public Records and Constituent Services unit at the Attorney General’s Office:
- (360)753-9673
- publicrecords@atg.wa.gov
The Payroll Simulation report generates a simulation for the payroll results as they will process within the final payroll run if no further adjustments are made to an employee’s master data. Be sure to work closely with processors from other functional areas as needed.
The HRMS Processor Guide recommends running this report at minimum, on Payroll Days 2 and 3, however processors can use this report at any time to validate master data changes for payroll purposes.
If an employee has a payroll redline, the payroll simulation will stop processing at the point of the error and the full simulation will not be available. If a payroll redline is shown in your simulation, refer to the Payroll Simulation – Correct a Payroll Redline report to fix the error.
Hourly employees must have submitted time for the selected pay period for this report to have accurate results.
Complete the steps for Payroll Simulation – Execute a Payroll Simulation.
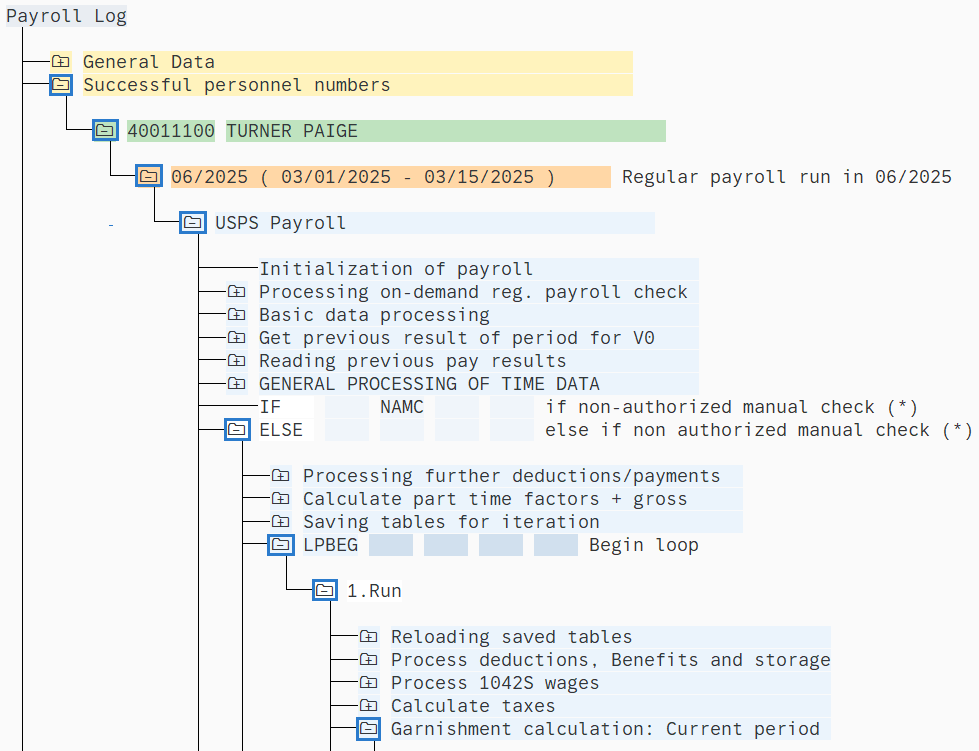
Click the folder to the left of the following selections to expand:
- Successful personnel numbers
- Employee name/personnel number
- Current Period
- USPS Payroll
- ELSE (else if non authorized manual check (*))
- LPBEG (Begin loop)
- Run
- Garnishment calculation (Current period)
Once you have selected the Garnishment calculation folder, click to the left of the following folders:
- IF (Actual period)
- IF GREX (Active garn., adjustm. in current period?)
- If GREX (Active garnishments?)
- UGARN CALC (Calculate garnishments)
- Processing
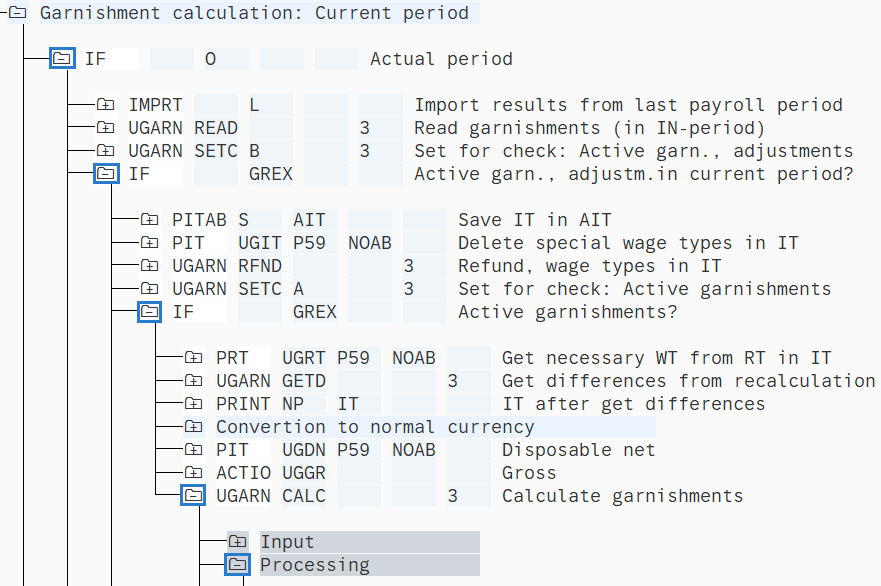
Once you have opened the Processing folder, double-click Pay off regular amount.

The Pay Off Regular Amount section will show which garnishment or garnishments are processing. It will also show the following information:
- Garnishment Number
- Limit
- Amount Due
- Amount to Pay
- Already taken
- Remaining
- Amount taken for this garnishment
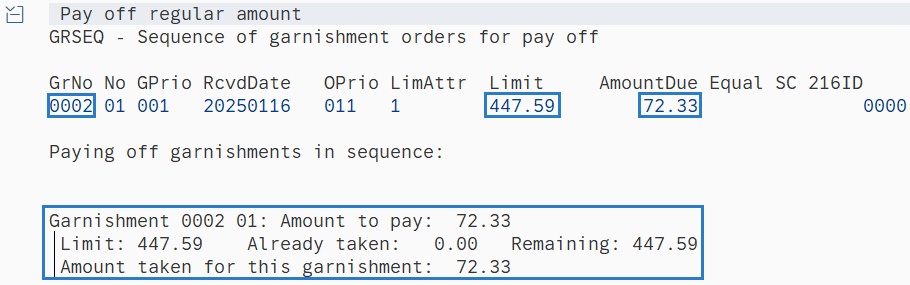
The above example shows that Garnishment Number 0002 is processing. The maximum limit the garnishment is allowed to take is $447.59. Since no amount has been taken, the remaining garnishment is still $447.59. The amount due for this pay period is $72.33.
Tips:If there are multiple garnishments, they will all process based off priority order.
Priority establishes the order in which a garnishment will be deducted from payroll. The highest priority is 001, while the lowest possible priority is 999. If an employee is subject to multiple garnishment documents of equal priority, the system will process these documents in the order that they were entered into the system; the garnishment with the earliest Received date will be processed first.
Refer to the Garnishments - Standard Processing procedures for more information.