Flexible Employee Data Report
Use this report to create ad hoc reports using employee master data fields for a variety of reasons such as:
- monitoring periodic increment dates,
- monitoring indirectly valued employees,
- auditing employee master data for accuracy, or
- viewing a list of employee email addresses.
This report provides point-in-time employee data only using a key date. This report does not include an option for entering a date range.
The following statewide variants are available for the Flexible Employee Data Report:
- SWV DATESPECS - Date Specifications
- SWV EMP SHAPSH - Employee Snapshot
- SWV PID - PID Variant
- SWV PSTAGL lst - Pay Scale TyArGrpLvl report
- SWV MA OVERIDE - Med Aid Override by job/persID
- SWV Mail Addr - SWV Mailing Address
- SWV EMAIL ADDR - Empl Email Address List
Refer to the Statewide Variant List for more information.
Authorization to view employee data is enforced based on the user’s active security profile in HRMS. For example, you cannot view an employee’s master data profile while they were employed with another agency.
The State of WA Flexible Employee Data Report (ZHR_RPTPAN02) is a customized report built specifically for Washington state employee HRMS users. A standard Flexible Employee Data report is also available using transaction code S_AHR61016362. This is a similar report that provides other employee master data field options such as date of birth.
Enter transaction code ZHR_RPTPAN02 in the command field and click the Enter button.

Complete the Key Date section.
Select one of the following radio buttons :
- Today
- Other keydate
 Tips:
Tips:The Key date section will determine the effective date of your report results.
Key date defaults to Today but can be changed to a different date.
You will receive a message if Other keydate is selected but Key Date is blank.
Complete the Selection section.
The following field is optional:
- Personnel Number
 Tips:
Tips:The Selection section will assist in getting only the information needed. A selection is not required for each field.
Additional fields can be added to the Selection section using the Further selections button.
For example, click the Further selections button and move Employment status and Personnel area from the Selection options (left) to the Selection fields (right) column. Now you can set filters on these fields.

Leaving the Employment status field blank will bring Withdrawn (0) employees into your reports results. Use this selection field to restrict your report results to only Active (3) and/or Inactive (1) employees.
If you use the Org. structure option to restrict your results by specific Organizational Units, results will automatically be restricted to Active (3) employees only. Results will not include Inactive (1) or Withdrawn (0) employees.
In the Data Limiter section, update the Number of Employees to restrict the number of records returned in your report results.
 Tips:
Tips:The Data Limiter for Number of Employees defaults to 100. This will return the first 100 employee records in your report results. You can change the Number of Employees to blank (return all employee records) or change it to another number.
If running data for a large number of employees, you may need to run the report in the background. Refer to Running Reports in the Background procedure.
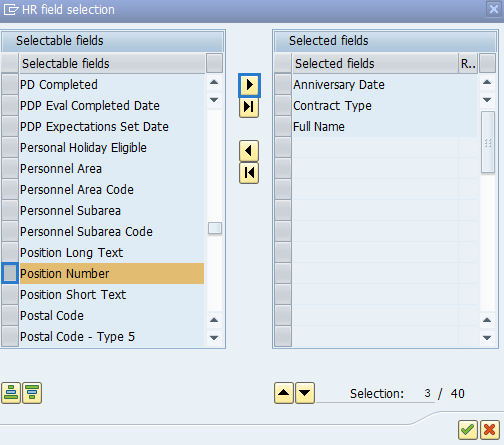
In the Additional data section, click the Field selection button and select the fields you want to display in your report results.

To add Field selection items, scroll through the alphabetical Selectable fields list and click on the gray box to the left of the fields you want to add and click the right arrow to move them to the Selected fields box.
 Tips:
Tips:You can also double-click field names to move them back and forth between boxes.
Once the fields have been added to the Selected fields box, you can change their order by clicking on the gray box to the left of the field and using the up and down arrows. You can also remove a field from the Selected fields list by selecting it and clicking on the left arrow to move it back to the Selectable fields list.
You can have a maximum of 40 fields displayed on your report. The HR field selection screen will display how many fields you have selected for your report and how many are available.
If an employee has more than one Education record and your selection incudes any of the Education options, the report will only display the oldest record for the employee.
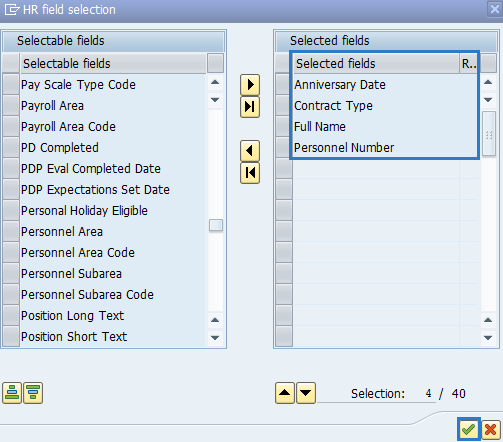
When all necessary report fields have been added to the Selected fields column, click the Continue (Enter) button.
 Tips:
Tips:On the report selection screen, the Field selection indicator will turn green once fields have been selected.

Report will not run until Field selection items are added.
Click the Execute button.
Sample report results:
 Tips:
Tips:In this example, the fields that were selected to be displayed were:
- Anniversay Date
- Contract Type
- Full Name
- Personnel Number

Report Fields and Infotypes
Refer to the Flexible Employee Data Infotype Table page to view the list of report fields and matching infoypes.